This chapter describes how to create a node-kit class. The examples show how to create a new subclass and how to customize the node-kit catalog. Creating a node kit is essentially the same as creating a node, except you use special node-kit macros found in SoSubKit.h. In addition, you use special macros for defining the node-kit catalog.
Before reading this chapter, be sure to read Chapter 14 in The Inventor Mentor, as well as Chapter 2 in this book.
The first part of this chapter offers an overview of the steps required to create a new node kit. When necessary, additional sections explain key concepts in further detail and list the relevant macros. The chapter examples show how to create three node-kit classes:
SoAppearanceKit, a node kit in the Inventor library, which is a simple grouping of properties
PyramidKit, a node kit that uses an existing node-kit class and changes one of its parts
JumpingJackKit, a node kit that adds new parts to the parent class, including a built-in event callback that moves the parts when the user selects the object with the mouse
Node kits are nodes that organize their children into a particular structure. This structure is defined by parts in a catalog. To define a new node-kit class, the main task is to create a catalog for the class (in addition to the standard tasks for deriving a “regular” node). Once a catalog is established, the rest of the functionality, such as setPart(), getPart(), and createPathToPart(), is provided by the base class for all node kits, SoBaseKit.
SoBaseKit is a direct descendant of SoNode. Therefore, when creating new node kits, you follow the standard procedure for creating and using new classes of nodes, except that you use the node-kit macros in the file SoSubKit.h. (Since you have to derive from at least SoBaseKit, you never need to include this file directly.) The SO_KIT_HEADER() macro declares type identifier and naming variables and methods that all node-kit classes must support. It also defines the private variable nodekitCatalog and a protected virtual method for retrieving it, getNodekitCatalog(). It defines the static method getClassNodekitCatalog() as well. The SO_KIT_SOURCE() macro defines the static variables and methods declared in the SO_KIT_HEADER() macro. Other macros useful in creating new node-kit classes are mentioned in the following sections.
Beyond this, most of the work for making a node kit focuses on creating the node-kit catalog. This catalog is a static variable and is therefore shared by all instances of the class. Whenever a user requests that a part should be added or retrieved (through getPart(), setPart(), and so on), the node-kit catalog is consulted. The node-kit catalog for any given class is created once when the first instance of that class is created.
Creating a new node kit requires these steps:
Select a name for the new node-kit class and determine what class it is derived from.
If the node kit has fields, define and name each field.
Design each part in the catalog. Use the
SO_KIT_CATALOG_ENTRY_HEADER() macro to declare a name for the part in the header file (see “Defining and Naming Catalog Entries”). The parts themselves are described in the constructor.Define an initClass() method to initialize the type information (see “Initializing the Node-Kit Class”).
Define a constructor (see “Defining the Constructor”).
Implement actions, if necessary. Typically, you won't need to implement additional actions for a node kit. You may, however, want to redefine the setDefaultOnNonWritingFields() method (see “Writing Information About Parts”).
Implement a copy() method if the node kit contains any non-field instance data (see Chapter 2).
Implement an affectsState() method if this method cannot be inherited from the parent class (see Chapter 2).
In the header file, use the macro SO_KIT_CATALOG_ENTRY_HEADER() for each part in the catalog. For example:
SO_KIT_CATALOG_ENTRY_HEADER(lightModel); SO_KIT_CATALOG_ENTRY_HEADER(environment); SO_KIT_CATALOG_ENTRY_HEADER(drawStyle); |
In the initClass() routine for your class, use the macro SO_KIT_INIT_CLASS(). For example:
JumpingJackKit::initClass()
{
   SO_KIT_INIT_CLASS(JumpingJackKit, SoBaseKit, "BaseKit");
}
|
In the constructor for the node-kit class, you define the new parts for the node-kit catalog and create the node-kit parts list for each instance (as well as performing the standard node subclass construction). Some parts may be created in the constructor as well.
A series of macros is used to define a node-kit catalog. They are described in “Defining a Node-Kit Part”. Initially, the catalog is the same as that of the parent class and is set up with the macro
SO_KIT_CONSTRUCTOR()
Next, you can modify the catalog by adding new parts. A new part is entered in the catalog using one of three macros:
SO_KIT_ADD_CATALOG_ENTRY()
SO_KIT_ADD_CATALOG_ABSTRACT_ENTRY()
SO_KIT_ADD_CATALOG_LIST_ENTRY()
Attributes of existing parts may be modified using these macros:
SO_KIT_ADD_LIST_ITEM_TYPE()
SO_KIT_CHANGE_ENTRY_TYPE()
SO_KIT_CHANGE_NULL_BY_DEFAULT()
The node-kit parts list is created by the macro SO_KIT_INIT_INSTANCE(). The parts list is a protected member containing pointers to all the existing parts in this instance of the node kit. This macro also creates any parts that are created by default, such as the “shape” part in the SoShapeKit (a cube) and the “light” part in the SoLightKit (a directional light).
The setUpConnections() method can be redefined by the class. If so, it is called at the end of the constructor. This method attaches or detaches sensors, callback functions, and field connections. It is called at the beginning and end of SoBaseKit::readInstance() and at the beginning and end of SoBaseKit::copy(). For each of these operations, it turns the sensors and field connections off, performs the operation, and then turns the sensors and field connections on again. See Chapter 8 for an example of using setUpConnections().
This section describes the parameters that define a part. “Case Study: The Parts of SoSeparatorKit” shows the values for these parameters as they are used in the catalog for SoSeparatorKit.
Node-kit catalogs are made up of parts in a particular arrangement. A part is completely described by the following parameters:
| SbName | name | |
| SoType | type | |
setPart("partName", newNode), | ||
the setPart() method first checks that newNode belongs to a class derived from type. The node is only installed as “partName” if it passes this type-checking test. | ||
| SoType | defaultType | |
| SbBool | nullByDefault | |
| SbBool | isLeaf | |
Leaf parts are the only ones in the catalog that the end user of the node kit can retrieve through calls like getPart() and createPathToPart(). All other parts are considered internal to the node kit. (Of course, not every leaf part can be returned. See isPublic on page 131.) | ||
Note that a part can still have children in a scene graph without having children within the catalog. For example, any public leaf part in the catalog whose type is derived from SoGroup can be retrieved with getPart(). Following this, children can be added. The result is that in the scene graph, this part is not a leaf node. But it is still a leaf part in the catalog. | ||
Some parts, such as the “childList” part in SoSeparatorKit, are list parts. A list part is always of type SoNodeKitList, a special type of group node, and the node kit ensures that only certain types of nodes are added to it as children. So, in a scene graph, it may very well have children. But in the catalog, it does not. | ||
Finally, imagine using an SoAppearanceKit as a leaf part in a higher level node kit such as an SoSeparatorKit. Children may be added to the “appearance” part through calls such as: | ||
myKit->setPart("appearance.material", myMtl) | ||
This could add a child to the part “appearance,” but the appearance part would remain a leaf part in the catalog. | ||
| SbName | parentName | |
| SbName | rightSiblingName | |
| SbBool | isList | |
| SoType | listContainerType | |
| SbPList | listItemTypes | |
addChild("myList", newChild) | ||
works only if newChild is derived from one of the types in the listItemTypes for the part “myList.” | ||
| SbBool | isPublic | |
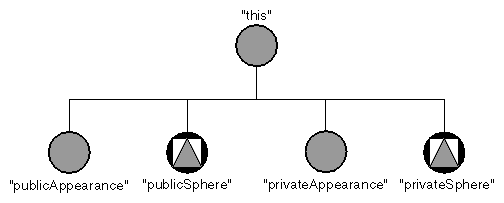
For example, consider the hypothetical PublicSpherePrivateSphereKit illustrated in Figure 7-1. If “privateAppearance” were a private part of type SoAppearanceKit, then the user could not call | ||
setPart("privateAppearance.material", newNode) | ||
because both “privateAppearance” and its material part are considered private. |
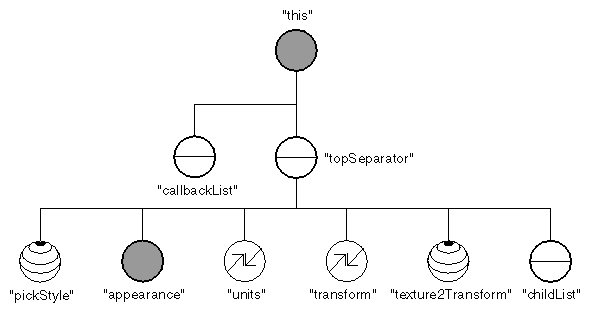
Figure 7-2 and Tables 7-1 through 7-3 show the parts of SoSeparatorKit. This kit is the base class for SoShapeKit and SoWrapperKit. Both subclasses inherit the parts in the SoSeparatorKit's catalog. The parts in this catalog are as follows:
| “callbackList” | a list part that can contain either SoCallback or SoEventCallback nodes. If you want to make your instance of an SoSeparatorKit respond to events, you can create callback nodes and add them to this list. This part is inherited from SoBaseKit. | |
| “topSeparator” | a separator node that is required to prevent the property nodes from influencing nodes outside the node kit. |
The “pickStyle,” “appearance,” “units,” “transform,” and “texture2Transform” parts are all composed of property nodes. Note that “appearance” is, in turn, a node kit.
Table 7-2. Catalog Layout Parameters of SoSeparatorKit Parts
name | isLeaf | parentName | rightSibling |
|---|---|---|---|
“this” | FALSE | “ ” | “ ” |
“callbackList” | TRUE | “this” | “topSeparator” |
“topSeparator” | FALSE | “this” | “ ” |
“pickStyle” | TRUE | “topSeparator” | “appearance” |
“appearance” | TRUE | “topSeparator” | “units” |
“units” | TRUE | “topSeparator” | “transform” |
“transform” | TRUE | “topSeparator” | “texture2Transform” |
“texture2Transform” | TRUE | “topSeparator” | “childList” |
“childList” | TRUE | “topSeparator” | “ ” |
Table 7-3. Behavior Parameters of SoSeparatorKit Parts
name | isList | listContainer- Type | listItemTypes | isPublic |
|---|---|---|---|---|
“this” | FALSE | -- | -- | FALSE |
“callbackList” | TRUE | SoSeparator | SoCallback and SoEventCallback | TRUE |
“topSeparator” | FALSE | -- | -- | FALSE |
“pickStyle” | FALSE | -- | -- | TRUE |
“appearance” | FALSE | -- | -- | TRUE |
“units” | FALSE | -- | -- | TRUE |
“transform” | FALSE | -- | -- | TRUE |
“texture2- Transform” | FALSE | -- | -- | TRUE |
“childList” | TRUE | SoSeparator | SoSeparatorKit | TRUE |
As mentioned in “Overview”, node-kit catalogs are defined within the constructor. Three macros assist you in defining new parts for the node-kit catalog:
| SO_KIT_ADD_CATALOG_ENTRY() |
| |
| SO_KIT_ADD_CATALOG_ABSTRACT_ENTRY() |
| |
| SO_KIT_ADD_CATALOG_LIST_ENTRY() |
|
To add new parts to a catalog, use the following macro:
SO_KIT_ADD_CATALOG_ENTRY(name, className, nullByDefault,
parentName, rightSiblingName, isPublicPart)
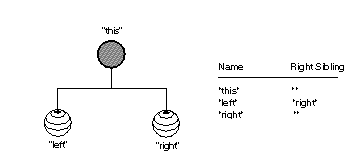
If your new part is a list part, or if the type is going to be an abstract type, see “Adding a List Entry” or “Adding an Entry of Abstract Type”. Note that the rightSiblingName may change if entries are added to the catalog. If you add another part later, it is possible that the rightSiblingName will change. Figures 7-3 and 7-4 illustrate this.
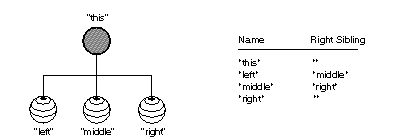
Suppose you want to add a part as the middle child in Figure 7-3. If the new part is a public label node that is NULL by default, you use the following macro:
SO_KIT_ADD_CATALOG_ENTRY(middle, SoLabel, TRUE, this,
                         right, TRUE);
|
Notice that part names are not quoted in macros. Figure 7-4 shows how the right sibling names change after this part has been added to the node kit.
If the part you wish to add is a list part, use the following macro, which adds the argument listItemClassName. This parameter is used for type-checking when the user attempts to add new nodes as children of the list parts.
SO_KIT_ADD_CATALOG_LIST_ENTRY(name, listContainerClassName,
nullByDefault, parentName,
rightName, listItemClassName,
isPublicPart)
If you want your list to accept more than one type of node, then use the macro SO_KIT_ADD_LIST_ITEM_TYPE(), described in “Adding a Type to a List Entry”. Note that the list container class name must be a subclass of SoGroup.
The “childList” part of SoSeparatorKit is a list of other SoSeparatorKits. The part itself is an SoNodeKitListPart node, and it is the rightmost part in the catalog below “topSeparator.” The container is an SoSeparator node.
The following code adds “childList” to the catalog:
SO_KIT_ADD_CATALOG_LIST_ENTRY(childList, SoSeparator, TRUE, topSeparator, , SoSeparatorKit, TRUE); |
If you wish to add a part of abstract type, you also need to provide the parameter defaultType, to be used when the kit has to construct the part on demand. This macro adds one parameter to the regular part-creation macro. Its syntax is
SO_KIT_ADD_CATALOG_ABSTRACT_ENTRY(name, className,
defaultClassName, nullByDefault, parentName,
rightName, isPublicPart)
For example, suppose you want to add an abstract part “anyKit” as the rightmost child of “this.” This part can be any node kit, but the defaultType is an appearance kit. To create this part:
SO_KIT_ADD_CATALOG_ABSTRACT_ENTRY(anyKit, SoBaseKit, SoAppearanceKit, TRUE, this, , TRUE); |
Three macros assist you in changing parts that have already been defined in the node kit (either in this class or in a parent class):
| SO_KIT_CHANGE_ENTRY_TYPE() |
| |
| SO_KIT_ADD_LIST_ITEM_TYPE() |
| |
| SO_KIT_CHANGE_NULL_BY_DEFAULT() |
|
If you wish to change the type or defaultType of a part that is inherited from the parent class, use the following macro. If you change the type, the new type must be a subclass of the inherited type. This is useful if the part has an abstract type in the parent class, but you wish to narrow this parameter in the child class. If you change the defaultType, any subclass of type is allowable. The syntax of this macro is
SO_KIT_CHANGE_ENTRY_TYPE(name, newClassName,
newDefaultClassName )
In this chapter, PyramidKit changes the type of the “shape” part from SoShape to Pyramid, and it changes the defaultType from SoCube to Pyramid:
SO_KIT_CHANGE_ENTRY_TYPE(shape, Pyramid, Pyramid); |
If you don't want a part to be written out, you can override the setDefaultOnNonWritingFields() method to call the base class version first. Then, for any part you don't want written out, call
partName.setDefault(TRUE);
Be aware, though, that the part may write out anyway under certain conditions. For example, if the part lies on a path that is being written to a file, the part will write out regardless of this setting.
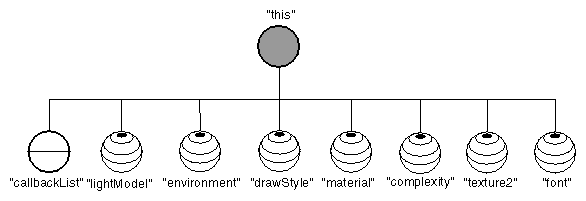
SoAppearanceKit is a subclass of SoBaseKit, provided as part of the standard Inventor library. It is a collection of all property nodes that affect the appearance of a rendered shape. Eight parts are added as direct children of the node kit. A diagram of the catalog's structure is shown in Figure 7-5.
Examples 7-1 and 7-2 show the complete header and source files for the SoAppearanceKit class. For brevity's sake, comments are omitted.
#include <Inventor/nodekits/SoBaseKit.h>

class SoAppearanceKit : public SoBaseKit {

   SO_KIT_HEADER(SoAppearanceKit);

   // Defines fields for the new parts in the catalog
   SO_KIT_CATALOG_ENTRY_HEADER(lightModel);
   SO_KIT_CATALOG_ENTRY_HEADER(environment);
   SO_KIT_CATALOG_ENTRY_HEADER(drawStyle);
   SO_KIT_CATALOG_ENTRY_HEADER(material);
   SO_KIT_CATALOG_ENTRY_HEADER(complexity);
   SO_KIT_CATALOG_ENTRY_HEADER(texture2);
   SO_KIT_CATALOG_ENTRY_HEADER(font);

  public:
   // Constructor
   SoAppearanceKit();

  SoINTERNAL public:
   static void initClass();

  private:

   // Destructor
   virtual ~SoAppearanceKit();
};
|
#include <Inventor/SoDB.h>
#include <Inventor/nodekits/SoAppearanceKit.h>
#include <Inventor/nodes/SoLightModel.h>
#include <Inventor/nodes/SoEnvironment.h>
#include <Inventor/nodes/SoDrawStyle.h>
#include <Inventor/nodes/SoMaterial.h>
#include <Inventor/nodes/SoComplexity.h>
#include <Inventor/nodes/SoTexture2.h>
#include <Inventor/nodes/SoFont.h>

SO_KIT_SOURCE(SoAppearanceKit);

void
SoAppearanceKit::initClass()
{
   SO_KIT_INIT_CLASS(SoAppearanceKit, SoBaseKit, "BaseKit");
}

//    Constructor
SoAppearanceKit::SoAppearanceKit()
{
   SO_KIT_CONSTRUCTOR(SoAppearanceKit);

   isBuiltIn = TRUE;

   // Initialize children catalog and add entries to it
   // These are the macros you use to make a catalog.
   // Use combinations of ...ADD_CATALOG_ENTRY
   // and ...ADD_CATALOG_LIST_ENTRY.  See SoSubKit.h for more
   // info on syntax of these macros.
   SO_KIT_ADD_CATALOG_ENTRY(lightModel,  SoLightModel, TRUE,
                            this, ,TRUE );
   SO_KIT_ADD_CATALOG_ENTRY(environment, SoEnvironment,TRUE,
                            this, ,TRUE );
   SO_KIT_ADD_CATALOG_ENTRY(drawStyle,   SoDrawStyle,  TRUE,
                            this, ,TRUE );
   SO_KIT_ADD_CATALOG_ENTRY(material,    SoMaterial,   TRUE,
                            this, ,TRUE );
   SO_KIT_ADD_CATALOG_ENTRY(complexity,  SoComplexity, TRUE,
                            this, ,TRUE );
   SO_KIT_ADD_CATALOG_ENTRY(texture2,    SoTexture2,   TRUE,
                            this, ,TRUE );

   SO_KIT_ADD_CATALOG_ENTRY(font, SoFont, TRUE, this, ,TRUE );

   SO_KIT_INIT_INSTANCE();
}

// Destructor (necessary since inline destructor is too
// complex)

// Use: public

SoAppearanceKit::~SoAppearanceKit()
{
}
|
The next two examples show PyramidKit, a new subclass of SoShapeKit that uses the Pyramid node created in Chapter 2. By making it a subclass of SoShapeKit, this new kit inherits all the parts, such as “appearance,” “transform,” and “units,” used by all the other shape kits. This class changes the type and defaultType of one of the parts in the parent class, SoShapeKit.
Example 7-3 shows the header file for PyramidKit. Example 7-4 shows the source code for this new node-kit class.
#include <Inventor/nodekits/SoShapeKit.h>

class PyramidKit : public SoShapeKit {
   SO_KIT_HEADER(PyramidKit);
  public:
   PyramidKit();
   static void initClass();
  private:
   virtual ~PyramidKit();
};
|
#include <Inventor/SoDB.h>

// Include files for new classes
#include "Pyramid.h"
#include "PyramidKit.h"

SO_KIT_SOURCE(PyramidKit);

void
PyramidKit::initClass()
{
   SO_KIT_INIT_CLASS(PyramidKit, SoShapeKit, "ShapeKit");
}

PyramidKit::PyramidKit()
{
   SO_KIT_CONSTRUCTOR(PyramidKit);

   // Change the 'shape' part to be a Pyramid node.
   SO_KIT_CHANGE_ENTRY_TYPE(shape, Pyramid, Pyramid );

   SO_KIT_INIT_INSTANCE();

}

PyramidKit::~PyramidKit()
{
}
|
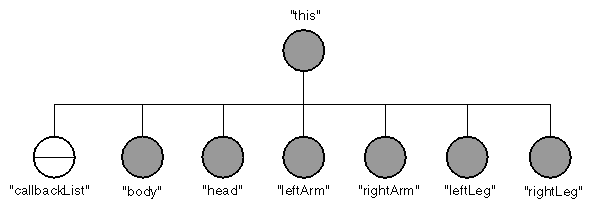
This section describes one more new class of node kit, JumpingJackKit. It is a stick figure of a man that responds to mouse events by moving his arms and legs back and forth. Figure 7-6 shows a diagram of Jack's catalog.
All parts of the body (“head,” “body,” “leftArm,” “rightArm,” “leftLeg,” “rightLeg”) are of type SoShapeKit, so that users can replace them with any shape they want.
An SoEventCallback node is added as a child of the “callbackList” part. When the mouse goes down over Jack, this node's callback animates the body by editing the transforms of the arm and leg body parts.
Example 7-5 shows the header file for JumpingJackKit.
#include <Inventor/nodekits/SoBaseKit.h>

class SoEventCallback;

class JumpingJackKit : public SoBaseKit {

   SO_KIT_HEADER(JumpingJackKit);

   SO_KIT_CATALOG_ENTRY_HEADER(body);
   SO_KIT_CATALOG_ENTRY_HEADER(head);
   SO_KIT_CATALOG_ENTRY_HEADER(leftArm);
   SO_KIT_CATALOG_ENTRY_HEADER(rightArm);
   SO_KIT_CATALOG_ENTRY_HEADER(leftLeg);
   SO_KIT_CATALOG_ENTRY_HEADER(rightLeg);

  public:
     JumpingJackKit();

     // Overrides default method. All the parts are shapeKits,
     // so this node will not affect the state.
     virtual SbBool affectsState() const;

   static void initClass();

  private:

   // Constructor calls to build and set up parts.
   void createInitialJack();

   // An SoEventCallback will be inserted into the
   // "callbackList" (inherited from SoBaseKit) as the part
   // "callbackList[0]". This routine jumpJackJump() will be
   // set as the callback function for that part. It is this
   // routine which changes the angles in the joints.
   static void jumpJackJump(void *userData,
     SoEventCallback *eventCB);

   virtual ~JumpingJackKit();
};
|
The constructor for JumpingJackKit calls createInitialJack(). This routine, shown in Example 7-6, constructs the man, moves the parts to a starting position, and creates an SoEventCallback node, which it installs as “callbackList[0].” The constructor also creates the node-kit catalog and performs other standard construction tasks.
The callback is called “jumpJackJump.” Basically, it sees if the mouse-down event occurred over the object. If so, then the limbs are rotated.
#include <Inventor/SoPickedPoint.h>
#include <Inventor/events/SoMouseButtonEvent.h>
#include <Inventor/nodekits/SoShapeKit.h>
#include <Inventor/nodes/SoCube.h>
#include <Inventor/nodes/SoCylinder.h>
#include <Inventor/nodes/SoEventCallback.h>
#include <Inventor/nodes/SoSphere.h>
#include <Inventor/nodes/SoTransform.h>

#include "JumpingJackKit.h"

SO_KIT_SOURCE(JumpingJackKit);

void
JumpingJackKit::initClass()
{
   SO_KIT_INIT_CLASS(JumpingJackKit,SoBaseKit, "BaseKit");
}

JumpingJackKit::JumpingJackKit()
{
   SO_KIT_CONSTRUCTOR(JumpingJackKit);

   // Add the body parts to the catalog...
   SO_KIT_ADD_CATALOG_ENTRY(body, SoShapeKit,
                            TRUE, this,, TRUE);
   SO_KIT_ADD_CATALOG_ENTRY(head, SoShapeKit,
                            TRUE, this,, TRUE);
   SO_KIT_ADD_CATALOG_ENTRY(leftArm, SoShapeKit,
                            TRUE, this,, TRUE);
   SO_KIT_ADD_CATALOG_ENTRY(rightArm, SoShapeKit,
                            TRUE, this,, TRUE);
   SO_KIT_ADD_CATALOG_ENTRY(leftLeg, SoShapeKit,
                            TRUE, this,, TRUE);
   SO_KIT_ADD_CATALOG_ENTRY(rightLeg, SoShapeKit,
                            TRUE, this,, TRUE);

   SO_KIT_INIT_INSTANCE();

   createInitialJack();
}

JumpingJackKit::~JumpingJackKit()
{
}

// This kit is made up entirely of SoShapeKits.
// Since SoShapeKits do not affect state, neither does this.
SbBool
JumpingJackKit::affectsState() const
{
   return FALSE;
}

// Set up parts for default configuration of the jumping jack
void
JumpingJackKit::createInitialJack()
{
   // Create the head.
   SoSphere *headSphere = new SoSphere;
   setPart("head.shape", headSphere);

   // Create the body.
   SoCube *bodyCube = new SoCube;
   setPart("body.shape", bodyCube);

   // Create the limbs
   SoCylinder *limbCylinder = new SoCylinder;
   setPart("leftLeg.shape",  limbCylinder);
   setPart("leftArm.shape",  limbCylinder);
   setPart("rightLeg.shape", limbCylinder);
   setPart("rightArm.shape", limbCylinder);

   // Place the body and head
   set("body.transform", "scaleFactor 1 2 1");
   set("head.transform", "translation 0 3 0");

   // Place the limbs
   set("leftArm.transform",  "scaleFactor 0.5 1.5 0.5");
   set("leftLeg.transform",  "scaleFactor 0.5 1.5 0.5");
   set("rightArm.transform", "scaleFactor 0.5 1.5 0.5");
   set("rightLeg.transform", "scaleFactor 0.5 1.5 0.5");
   set("leftArm.transform",  "center 0 1 0");
   set("leftLeg.transform",  "center 0 1 0");
   set("rightArm.transform", "center 0 1 0");
   set("rightLeg.transform", "center 0 1 0");
   set("leftArm.transform",  "translation -1  1   0.5");
   set("leftLeg.transform",  "translation -1 -2.5 0.5");
   set("rightArm.transform", "translation  1  1   0.5");
   set("rightLeg.transform", "translation  1 -2.5 0.5");

   // Create the Event Callback to make jack jump.
   // When it receives a mouse button event, it will
   // call the method jumpJackJump.
   SoEventCallback *myEventCB = new SoEventCallback;
   myEventCB->addEventCallback(
           SoMouseButtonEvent::getClassTypeId(),
           JumpingJackKit::jumpJackJump, this);
   setPart("callbackList[0]", myEventCB);
}

// Animates the jumping jack (called by the "eventCallback[0]"
// part when a left mouse button press occurs).
void
JumpingJackKit::jumpJackJump(void *userData,
                             SoEventCallback *myEventCB)
{
   const SoEvent *myEvent = myEventCB->getEvent();

   // See if it's a left mouse down event
   if (SO_MOUSE_PRESS_EVENT(myEvent, BUTTON1)) {
     JumpingJackKit *myJack = (JumpingJackKit *) userData;

     // See if the jumping jack was picked.
     const SoPickedPoint *myPickedPoint;
     myPickedPoint = myEventCB->getPickedPoint();
     if (myPickedPoint && myPickedPoint->getPath() &&
         myPickedPoint->getPath()->containsNode(myJack)) {

       // The jumping jack was picked. Make it jump!
       SoTransform *myXf;
       SbVec3f zAxis(0,0,1);
       SbRotation noRot = SbRotation::identity();

       myXf = SO_GET_PART(myJack,
                          "leftArm.transform",SoTransform);
       if (myXf->rotation.getValue() == noRot)
         myXf->rotation.setValue(zAxis ,-1.6);
       else
         myXf->rotation.setValue(noRot);

       myXf = SO_GET_PART(myJack,
                          "leftLeg.transform",SoTransform);
       if (myXf->rotation.getValue() == noRot)
         myXf->rotation.setValue(zAxis ,-1.2);
       else
         myXf->rotation.setValue(noRot);
       myXf = SO_GET_PART(myJack,
                          "rightArm.transform",SoTransform);
       if (myXf->rotation.getValue() == noRot)
         myXf->rotation.setValue(zAxis , 1.6);
       else
         myXf->rotation.setValue(noRot);

       myXf = SO_GET_PART(myJack,
                          "rightLeg.transform",SoTransform);
       if (myXf->rotation.getValue() == noRot)
         myXf->rotation.setValue(zAxis , 1.2);
       else
         myXf->rotation.setValue(noRot);
       myEventCB->setHandled();
     }
   }
}
|
Example 7-7 shows a short program to create a jumping jack that responds to user events. Notice how it calls initClass() for JumpingJackKit before it creates an instance of this new node-kit class.
#include <Inventor/Xt/SoXt.h>
#include <Inventor/Xt/viewers/SoXtExaminerViewer.h>

// Header files for new node class
#include "JumpingJackKit.h"

main(int, char **argv)
{
   // Initialize Inventor and Xt
   Widget myWindow = SoXt::init(argv[0]);
   if (myWindow == NULL) exit(1);

   // Initialize the new node class
   JumpingJackKit::initClass();

   JumpingJackKit *jackyBaby = new JumpingJackKit;
   jackyBaby->ref();

   SoXtExaminerViewer *viewer =
     new SoXtExaminerViewer(myWindow);
   viewer->setSceneGraph(jackyBaby);
   viewer->setTitle("JumpingJackKit");
   viewer->show();
   viewer->viewAll();

   SoXt::show(myWindow);
   SoXt::mainLoop();
}
|

