Chapter Objectives
After reading this chapter, you'll be able to do the following:
Apply textures to objects in the scene graph using the default values for texture mapping
Apply textures to objects in the scene graph by specifying texture coordinates explicitly
Use texture-coordinate functions such as SoTextureCoordinatePlane and SoTextureCoordinateEnvironment to map textures onto objects
Create a texture map that can be stored in memory and applied to an object
Wrap a texture around an object so that the image is repeated
Specify how a texture affects the underlying shaded color of an object
This chapter explains how to use textures, which allow you to add realism and detail to scenes. In Inventor, you create a 2D texture image and then apply this texture to the surface of a 3D shape object. The rectangular patch of texture you define is stretched and compressed to “fit” the 3D shape according to your specifications. Key concepts introduced in this chapter include texture map, wrapping textures, texture model, texture components, and environment mapping.
Using textures, you can create a table with a wood grain, an orange with a dimpled, shiny surface, and a field of grass. To do so, first create wood, orange peel, and grass textures and then apply the textures to the various shape objects. Figure 7-1 contrasts two sets of objects: the objects on the right use texture mapping, and the objects on the left do not use textures.

A texture map is a 2D array of pixel information for a particular pattern, or texture. Inventor, like OpenGL, uses the letter s for the horizontal texture coordinate and t for the vertical texture coordinate. A texture map is a 1×1 square, with coordinates ranging from 0.0 to 1.0 in both the s and t dimensions, as shown in Figure 7-2. Texture coordinates are assigned to each vertex of a polygon (this assignment is done either explicitly by you, or automatically by Inventor). If the pixels in the texture do not match up exactly with the pixels in the polygon, Inventor uses a filtering process to assign texture pixels to the object. The texture is read from a file or from memory.
This section describes use of the following node classes:

The SoComplexity node has a textureQuality field that relates to texture mapping as well. It allows you to specify a value between 0.0 and 1.0, with 0.0 for the fastest rendering and 1.0 for the finest texturing. (In general, there is a trade-off between speed and the quality of texturing.) The default value for this field is 0.5.
Although you can affect how a texture is applied to an object in many ways, the simplest way to use textures is to use the default values. If you use textures, you need only an SoTexture2 node (for the texture) and a shape node (the target object). Example 7-1, which displays a textured cube, illustrates this method. See “SoTexture2 Node” for a detailed description of the SoTexture2 node and its defaults.
#include <Inventor/Xt/SoXt.h>
#include <Inventor/Xt/viewers/SoXtExaminerViewer.h>
#include <Inventor/nodes/SoCube.h>
#include <Inventor/nodes/SoSeparator.h>
#include <Inventor/nodes/SoTexture2.h>

main(int , char **argv)
{
   Widget myWindow = SoXt::init(argv[0]);
   if(myWindow == NULL) exit(1);

   SoSeparator *root = new SoSeparator;
   root->ref();

   // Choose a texture
   SoTexture2 *rock = new SoTexture2;
   root->addChild(rock);
   rock->filename.setValue("brick.1.rgb");

   // Make a cube
   root->addChild(new SoCube);

   SoXtExaminerViewer *myViewer =
            new SoXtExaminerViewer(myWindow);
   myViewer->setSceneGraph(root);
   myViewer->setTitle("Default Texture Coords");
   myViewer->show();

   SoXt::show(myWindow);
   SoXt::mainLoop();
}
|
This section explains some special ways you can change how a texture is applied to a shape object. These variations include the following:
How the texture wraps around the object
How the texture affects the object's underlying colors
In addition, this section explains how to specify the pixels for a texture image to be stored in memory.
Texture coordinates range from 0.0 to 1.0 in each dimension (see “What Is a Texture Map?”). What happens, then, if your polygon texture coordinates range from 0.0 to 2.0 in some dimension? In such cases, you have a choice:
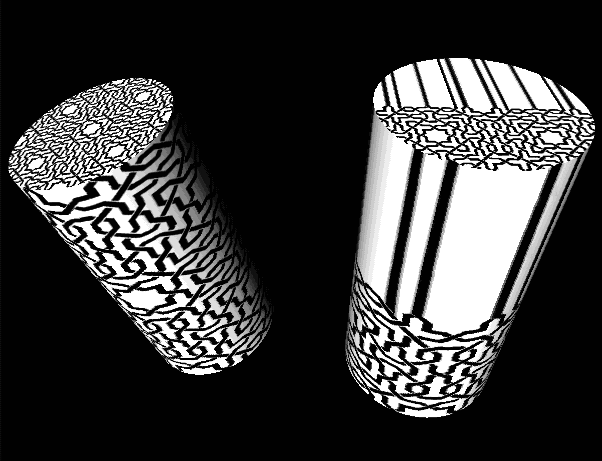
Figure 7-3 shows examples of both types of wrapping. The cylinder on the left has the texture repeated twice along its length and around its circumference. The cylinder on the right has the top scanline clamped, by setting wrapT to CLAMP. See “SoTexture2 Node” for a description of the wrapS and wrapT fields.
You can specify one of three texture models to use (see “SoTexture2 Node”). Each model causes the texture map to affect the underlying colors of the polygon in different ways. The model types are as follows:
The MODULATE model can be used with any texture file. The BLEND model is used with one- or two-component files. The DECAL model is used with three- or four-component files. See “Components of a Texture”.
 | Tip: MODULATE works best on bright materials because the texture intensity, which is less than or equal to 1.0, is multiplied by the shaded color. |
Figure In-11 through Figure In-14 show examples of each texture model. The image in Figure In-11 shows the scene without a texture. The image in Figure In-12 uses a MODULATE model, so the color of the building is a combination of the texture and material colors. The image in Figure In-13 uses a DECAL model, so the color of the building is determined completely by the texture map. The image in Figure In-14 uses the BLEND model, so the color of the building blends between the underlying material color and the blend color value (gold).
| Tip: To create bright green polka dots on an object, create a black and white texture with white dots. Then use the BLEND texture model with a green blend color. |
See the glTexEnv() function in the OpenGL Reference Manual for the actual equations used to calculate the final textured object colors.
| Tip: If you use MODULATE, you may want to surround your texture images with a one-pixel border of white pixels and set wrapS and wrapT to CLAMP so that the object's color is used where the texture runs out. |
Texture maps are read from a file or from memory. For information on what image file formats your platform supports, see your release documentation.
You can store a texture map as an SoSFImage and then specify the image in the image field of the SoTexture2 node. This section provides details on how to store the texture-map pixels in memory. The texture, whether stored in a file or in memory, can contain from one to four components, as described in the following section.
A texture can be one of the following types:
One-component texture—contains only an intensity value. This type of texture is often referred to as an intensity map. For example, an image of a mountain could use a one-component texture and vary the intensity of a constant-color polygon to make the image more realistic.
Two-component texture—contains an intensity value and an alpha (transparency) value. For example, you can create a tree with leaves made of polygons of varying intensity, from dark green to bright green. Then, you can vary the transparency at the edges of the leaf
area, so that you can see around the edges of the leaves to the objects behind them.
Three-component texture—contains red, green, and blue values. This is a red-green-blue image, such as a photo or a commonly used texture such as brick, concrete, or cloth.
Four-component texture—contains red, green, blue, and alpha (transparency) values. This texture is similar to the RGB three-component texture, but also contains transparency information. You can use a four-component texture to create a colorful New England maple tree in October using the technique described previously for two-component textures.
| Tip: One- and two-component textures are generally faster than three- and four-component textures, since they require less computation. |
Use the setValue() method to assign the value to the SoSFImage. This method requires you to supply the size of the texture (width * height, in pixels), the number of components in the texture, and the values of the components for each pixel (as an array of unsigned chars, with values 0 to 255).
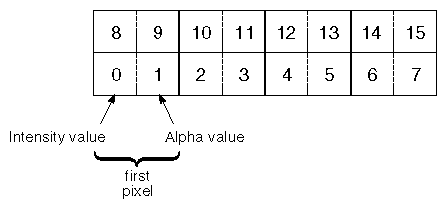
For a one-component texture, each byte in the array stores the intensity value for one pixel. As shown in Figure 7-4, byte 0 is the lower left corner of the pixel map, and numbering of bytes is from left to right within each row.
For example, to store a one-component texture, the code would be
SoTexture2 *textureNode = new SoTexture2;
// A 3-by-2 array of black and white pixels; the array is
//upside-down here (the first pixel is the lower left corner)
unsigned char image [] = {
   255, 0,
   0, 255,
   255, 0
};
//Set the image field:
textureNode->image.setValue(SbVec2s(3,2), 1, image);
|

For a two-component texture, byte 0 is the intensity of the first pixel, and byte 1 is the alpha (transparency) value for the first pixel. Bytes 2 and 3 contain the information for pixel 2, and so on (see Figure 7-5).
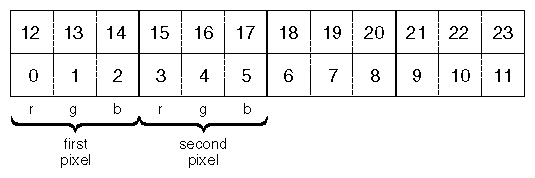
A three-component texture requires three bytes to store the information for each pixel. For the first pixel, byte 0 contains the red value, byte 1 contains the green value, and byte 2 contains the blue value (see Figure 7-6). A four-component texture requires four bytes for each pixel (red, green, blue, and alpha values).
An SoTexture2 node specifies the image for the texture map, how the texture wraps around the object, and the texture model to use.
The SoTexture2 node has the following fields:
| filename (SoSFName) |
| |
| image (SoSFImage) |
| |
| wrapS (SoSFEnum),wrapT (SoSFEnum) |
| |
| model (SoSFEnum) |
| |
| blendColor (SoSFColor) |
|
The textureQuality field of the SoComplexity node controls the quality of filtering used to apply the texture. A value of 0.0 disables texturing completely, and a value of 1.0 specifies to use the highest quality of texturing. The default value for this field is 0.5.
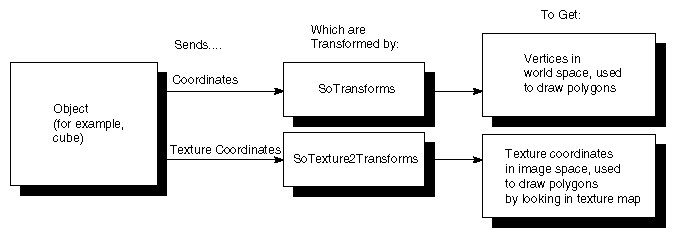
You can transform the texture map by inserting an SoTexture2Transform node into the scene graph before the shape node. This node has a cumulative effect and is applied to the texture coordinates. As shown in Figure 7-7, the relationship between the SoTexture2Transform node and the SoTextureCoordinate2 node is analogous to the relationship between the SoTransform nodes and the SoCoordinate nodes.
The fields of the SoTexture2Transform node are as follows:
| translation (SoSFVec2f) |
| |
| rotation (SoSFFloat) |
| |
| scaleFactor (SoSFVec2f) |
| |
| center (SoSFVec2f) |
|
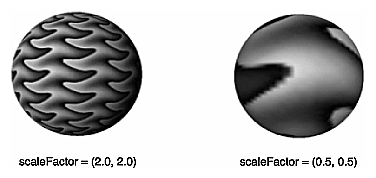
In Figure 7-8, the sphere on the left has a texture scaleFactor of (2.0, 2.0), so the texture is repeated twice in s and t. The sphere on the right has a texture scaleFactor of (0.5, 0.5), so only half the texture is used in both the s and t directions.
You can choose one of three techniques for mapping the 2D texture space onto the 3D object space:
Use the default texture coordinates. The texture is applied in different ways for different shapes, as described later in this section.
For shapes derived from SoVertexShape, you can specify the texture coordinates explicitly. With this method, you create an SoTextureCoordinate2 node and specify a texture coordinate for each vertex in the shape.
Use one of the texture-coordinate functions to map the texture to the shape:
SoTextureCoordinatePlane
SoTextureCoordinateEnvironment
Techniques 1 and 3 are automatic, and hence easy to use. Technique 2 requires explicit coordinates generated by you and is thus harder to use but gives more explicit control. Each of these three techniques is described in detail in the following sections.
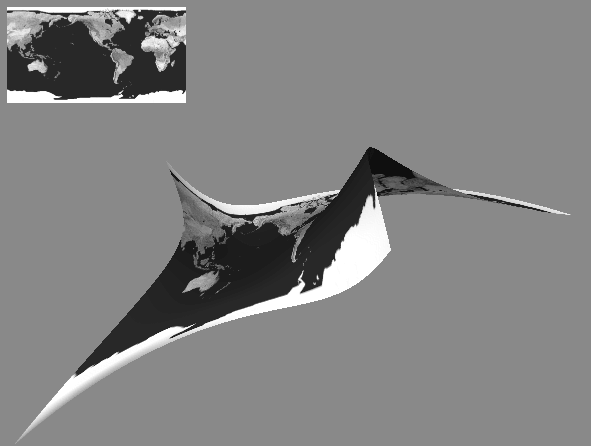
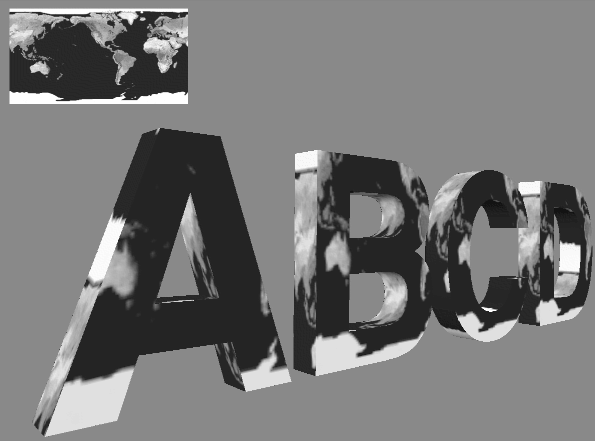
Inventor uses the same technique for generating default texture coordinates for any shape that is derived from SoVertexShape. First, it computes the bounding box of the object. Then, it uses the longest edge of the box as the horizontal (s) axis of the texture. It uses the next longest edge as the vertical (t) axis of the texture. The value of the s coordinate ranges from 0.0 to 1.0, from one end of the bounding box to the other. The value of t ranges from 0 to n, where n equals the ratio of the second longest side of the bounding box to the longest side (the effect is that the texture is applied to the longest side of the box, without distortion).
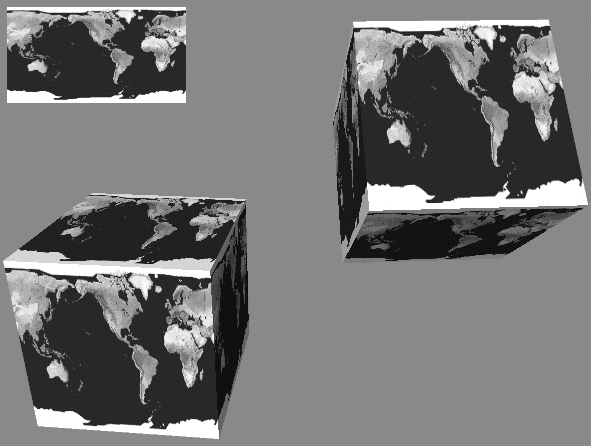
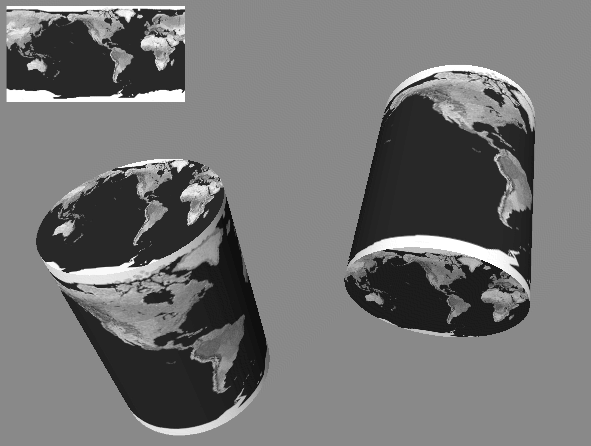
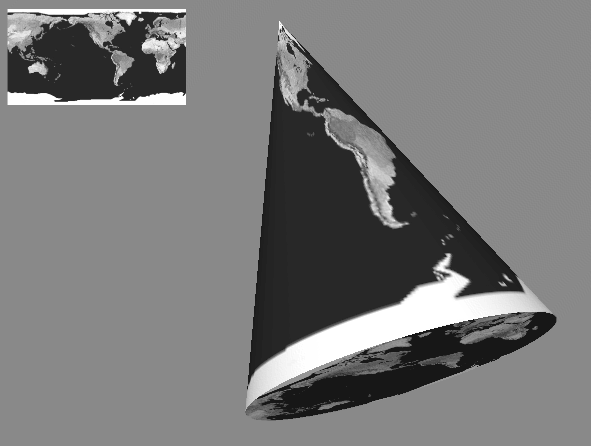
For shapes that are not derived from SoVertexShape, the default texture coordinates are generated differently for each shape. These shapes include SoCone, SoCube, SoCylinder, SoNurbsSurface, SoSphere, and SoText3. Default texture mapping for each of these shapes is described in the following paragraphs.
For example, if your scene graph contains an SoTexture2 node followed by an SoSphere node, the texture is applied to the sphere using default texture coordinates. The texture covers the entire surface of the sphere, wrapping counterclockwise from the back of the sphere (see Figure 7-9). The texture wraps around and connects to itself. A visible seam can result if the texture is nonrepeating.

When a texture is applied to an SoCube using the default texture coordinates, the entire texture is applied to each face. On the front, back, right, and left sides of the cube, the texture is applied right-side up. On the top, the texture appears right-side up if you tilt the cube toward you. On the bottom, the texture appears right-side up if you tilt the cube away from you (see Figure 7-10).
When a texture is applied to an SoCylinder using the default texture coordinates, the texture wraps around the sides in a counterclockwise direction, beginning at the -z axis. A circle cut from the center of the texture square is applied to the top and bottom of the cylinder. When you look at the cylinder from the +z axis, the texture on the top appears right-side up when the cylinder tips towards you. The texture on the bottom appears right-side up when the cylinder tips away from you (see Figure 7-11).
When a texture is applied to an SoCone using the default texture coordinates, the texture wraps counterclockwise around the sides of the cone, starting at the back of the cone. The texture wraps around and connects to itself. A visible seam can result if the texture is nonrepeating. A circle cut from the center of the texture square is applied to the bottom of the cone just as it is applied to the bottom of a cylinder (see Figure 7-12).
| Tip: Increasing the complexity of a textured cone is especially important because of the way the texture is mapped near the tip of the cone. |
When a texture is applied to a NURBS surface using the default texture coordinates, the edges of the texture square are stretched to fit the NURBS patch (see Figure 7-13). A surface can be made up of many patches, like the teapot. If the NURBS surface is trimmed, so is the texture.
When a texture is applied to the front of an SoText3 surface using the default texture coordinates, texture coordinate (0,0) is at the text's origin. The distance from 0.0 to 1.0 in s and t texture coordinates is equal to the font size. For the sides of an SoText3 surface, using default texture mapping, the s coordinate extends forward along the text profile, starting with texture coordinate 0.0 at the back of the letter and increasing to the front. A font-size distance along the profile is a texture coordinate distance of 1.0. The t coordinates extend around the outline of the character clockwise in a similar fashion. (See Figure 7-13.)
Sometimes, you may want to explicitly specify the texture coordinates for each vertex of an object. In this case, create an SoTextureCoordinate2 node and specify the set of 2D texture coordinates to be applied to the vertices of the shape.
When you use this technique, you must specify a texture coordinate for each vertex in the shape. The coordinates are specified in pairs: the s coordinate followed by the t coordinate.
Example 7-2 shows specifying texture coordinates explicitly. It uses an SoTextureCoordinateBinding node to index into the texture-coordinates list.
#include <Inventor/Xt/SoXt.h>
#include <Inventor/Xt/viewers/SoXtExaminerViewer.h>
#include <Inventor/nodes/SoCoordinate3.h>
#include <Inventor/nodes/SoFaceSet.h>
#include <Inventor/nodes/SoNormal.h>
#include <Inventor/nodes/SoNormalBinding.h>
#include <Inventor/nodes/SoSeparator.h>
#include <Inventor/nodes/SoTexture2.h>
#include <Inventor/nodes/SoTextureCoordinate2.h>
#include <Inventor/nodes/SoTextureCoordinateBinding.h>

main(int , char **argv)
{
   Widget myWindow = SoXt::init(argv[0]);
   if(myWindow == NULL) exit(1);

   SoSeparator *root = new SoSeparator;
   root->ref();

   // Choose a texture
   SoTexture2 *brick = new SoTexture2;
   root->addChild(brick);
   brick->filename.setValue("brick.1.rgb");

   // Define the square's spatial coordinates
   SoCoordinate3 *coord = new SoCoordinate3;
   root->addChild(coord);
   coord->point.set1Value(0, SbVec3f(-3, -3, 0));
   coord->point.set1Value(1, SbVec3f( 3, -3, 0));
   coord->point.set1Value(2, SbVec3f( 3,  3, 0));
   coord->point.set1Value(3, SbVec3f(-3,  3, 0));

   // Define the square's normal
   SoNormal *normal = new SoNormal;
   root->addChild(normal);
   normal->vector.set1Value(0, SbVec3f(0, 0, 1));

   // Define the square's texture coordinates
   SoTextureCoordinate2 *texCoord = new SoTextureCoordinate2;
   root->addChild(texCoord);
   texCoord->point.set1Value(0, SbVec2f(0, 0));
   texCoord->point.set1Value(1, SbVec2f(1, 0));
   texCoord->point.set1Value(2, SbVec2f(1, 1));
   texCoord->point.set1Value(3, SbVec2f(0, 1));

   // Define normal and texture coordinate bindings
   SoNormalBinding *nBind = new SoNormalBinding;
   SoTextureCoordinateBinding *tBind =
            new SoTextureCoordinateBinding;
   root->addChild(nBind);
   root->addChild(tBind);
   nBind->value.setValue(SoNormalBinding::OVERALL);
   tBind->value.setValue
            (SoTextureCoordinateBinding::PER_VERTEX);

   // Define a FaceSet
   SoFaceSet *myFaceSet = new SoFaceSet;
   root->addChild(myFaceSet);
   myFaceSet->numVertices.set1Value(0, 4);

   SoXtExaminerViewer *myViewer =
            new SoXtExaminerViewer(myWindow);
   myViewer->setSceneGraph(root);
   myViewer->setTitle("Texture Coordinates");
   myViewer->show();

   SoXt::show(myWindow);
   SoXt::mainLoop();
}
|
A third way to map texture coordinates onto an object is through the use of a texture-coordinate function. A texture-coordinate function defines the texture coordinates for an object based on the position of each vertex in the object. Each texture-coordinate function uses a different algorithm for calculating the texture coordinates, as described in detail in the following subsections. These functions allow you to specify texture mapping in a general way, without requiring you to define explicit texture coordinates. The texture-coordinate function ignores the current texture coordinates specified by an SoTextureCoordinate2 node.
Inventor includes two texture-coordinate functions:
To use the default texture coordinates (in effect, to “turn off” the effect of any previous texture-coordinate node in the scene graph without using a separator), use the SoTextureCoordinateDefault node.
SoTextureCoordinatePlane, probably the most commonly used texture-coordinate function, projects a texture plane onto a shape object, as shown in Figure In-15. You define an s and a t direction, which are used to define a plane for the texture. The texture coordinate (s) is then defined by the following equation, where coord is a coordinate in the object:
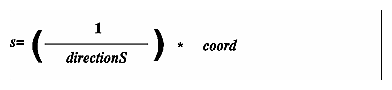
The fields for SoTextureCoordinatePlane are as follows:
| directionS (SoSFVec3f) |
| |
| directionT (SoSFVec3f) |
|
The length of the direction vector equals the repeat interval of the texture (see Example 7-3).
Example 7-3 shows the use of SoTextureCoordinatePlane (see “SoTextureCoordinatePlane with Different Repeat Frequencies”). It draws three texture-mapped spheres, each with a different repeat frequency as defined by the fields of the SoTextureCoordinatePlane node.
#include <Inventor/nodes/SoMaterial.h>
#include <Inventor/nodes/SoSeparator.h>
#include <Inventor/nodes/SoSphere.h>
#include <Inventor/nodes/SoTexture2.h>
#include <Inventor/nodes/SoTexture2Transform.h>
#include <Inventor/nodes/SoTextureCoordinatePlane.h>
#include <Inventor/nodes/SoTranslation.h>

#include <Inventor/Xt/SoXt.h>
#include <Inventor/Xt/viewers/SoXtExaminerViewer.h>

main(int , char **argv)
{
   Widget myWindow = SoXt::init(argv[0]);
   if(myWindow == NULL) exit(1);

   SoSeparator *root = new SoSeparator;
   root->ref();

   // Choose a texture.
   SoTexture2 *faceTexture = new SoTexture2;
   root->addChild(faceTexture);
   faceTexture->filename.setValue("sillyFace.rgb");
   // Make the diffuse color pure white
   SoMaterial *myMaterial = new SoMaterial;
   myMaterial->diffuseColor.setValue(1,1,1);
   root->addChild(myMaterial);
|
   // This texture2Transform centers the texture about (0,0,0)
   SoTexture2Transform *myTexXf = new SoTexture2Transform;
   myTexXf->translation.setValue(.5,.5);
   root->addChild(myTexXf);

   // Define a texture coordinate plane node.  This one will
   // repeat with a frequency of two times per unit length.
   // Add a sphere for it to affect.
   SoTextureCoordinatePlane *texPlane1 = new
             SoTextureCoordinatePlane;
   texPlane1->directionS.setValue(SbVec3f(2,0,0));
   texPlane1->directionT.setValue(SbVec3f(0,2,0));
   root->addChild(texPlane1);
   root->addChild(new SoSphere);

   // A translation node for spacing the three spheres.
   SoTranslation *myTranslation = new SoTranslation;
   myTranslation->translation.setValue(2.5,0,0);

   // Create a second sphere with a repeat frequency of 1.
   SoTextureCoordinatePlane *texPlane2 = new
            SoTextureCoordinatePlane;
   texPlane2->directionS.setValue(SbVec3f(1,0,0));
   texPlane2->directionT.setValue(SbVec3f(0,1,0));
   root->addChild(myTranslation);
   root->addChild(texPlane2);
   root->addChild(new SoSphere);

   // The third sphere has a repeat frequency of .5
   SoTextureCoordinatePlane *texPlane3 = new
            SoTextureCoordinatePlane;
   texPlane3->directionS.setValue(SbVec3f(.5,0,0));
   texPlane3->directionT.setValue(SbVec3f(0,.5,0));
   root->addChild(myTranslation);
   root->addChild(texPlane3);
   root->addChild(new SoSphere);

   SoXtExaminerViewer *myViewer = new SoXtExaminerViewer(myWindow);
   myViewer->setSceneGraph(root);
   myViewer->setTitle("Texture Coordinate Plane");
   myViewer->show();

   SoXt::show(myWindow);
   SoXt::mainLoop();
}
|
The SoTextureCoordinateEnvironment node specifies that subsequent objects should reflect their environment, just as a shiny round Christmas ornament reflects its surroundings. For best results, the texture map specified should be a spherical reflection map. See the OpenGL Programming Guide, Chapter 9, for tips on how to create a spherical reflection map.
When SoTextureCoordinateEnvironment is used, a calculation is made at each vertex of the polygon to determine where a vector from the viewpoint to the vertex would be reflected. This reflection point defines the texture coordinate for that point on the polygon. See Figure In-17 and Figure In-18.
Because of the way environment mapping is implemented in OpenGL, environment maps are accurate only if the camera does not move relative to the environment being reflected.