Chapter Objectives
After reading this chapter, you'll be able to do the following:
Explain how Open Inventor handles input events
Select objects in the scene using one of Inventor's built-in selection policies
Implement your own selection policy by creating an event callback node
Highlight selected objects in the scene
Write selection callback functions to allow the application to perform certain operations when the selection list changes
This chapter describes the Open Inventor event model, which provides a simple mechanism for passing events such as a key press or mouse movement to objects in the database for processing. In much the same way a window system passes events to its client windows, Inventor passes events to database objects that can handle them. Important concepts introduced in this chapter include the Inventor programming model for event handling and the use of the SoXtRenderArea, a widget that performs rendering and event handling on the Inventor database. The SoHandleEventAction is discussed in detail, as well as the concepts of event callback functions, the selection node, and highlighting.
When a user clicks a mouse button on a handle-box manipulator and drags the object to a new location on the screen, how does Inventor receive the user input from the mouse and translate the object accordingly? What happens if the user clicks the mouse on a space in the rendered image that doesn't contain any objects? How does Inventor keep track of several user-selected objects? These are all questions that need to be answered before you can write interactive Inventor applications.
This chapter begins by providing a brief description of how window-specific events are translated into Inventor events. It introduces you to the different kinds of Inventor events and the methods associated with them. You will learn how the scene manager finds the event handler for a specific event and how different nodes handle events.
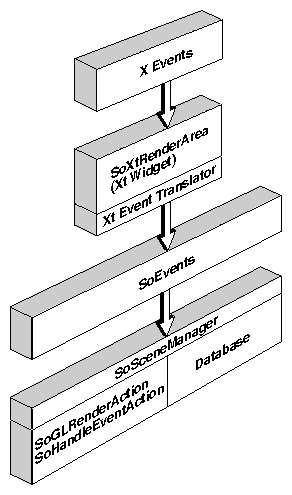
Inventor includes a built-in event model for the scene database. This model is not based on any specific window system or toolkit. When writing an Inventor program, you can select the X window programming model and use the tools provided by the window system to open windows and pass events into Inventor. Inventor provides event translation from X events into the Inventor event classes. Figure 10-1 shows how X events are passed to the render area and then translated into Inventor events that are handled by the Inventor scene manager. Since Inventor is independent of any window system, you can also choose a different window system and then write your own event translator.
Inventor provides a set of Xt utilities for use with the X Window System. This set of utilities contains the following:
In addition to these features, the Inventor Component Library also contains a set of Xt components. These components include viewers and editors with a user interface for modifying the scene database directly.
This chapter focuses on the aspects of Inventor that are independent of the window system:
Chapter 16 describes use of the Inventor Component Library in more detail. If you want to use Inventor viewers and editors, you must use an Xt render area (SoXtRenderArea) and the X Window System model. If you are not using these viewers and editors, you can choose a different window system and then implement your own render area, event loop, and event translator.
The render-area widget provides a convenient object for creating a window and translating window-specific events into generic Inventor events. With the X Window System model, you create an SoXtRenderArea (see Figure 10-1). Window-specific events are passed into this render area and then automatically translated into a generic Inventor SoEvent.
The render area provides the following:
The class tree for SoEvent is shown in Figure 10-2.
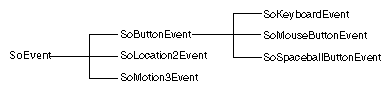
Each SoEvent instance contains the following information:
Subclasses of SoEvent contain additional information. For example, SoButtonEvent contains information about whether the button was up or down when the event occurred. SoMouseButtonEvent contains information about which button was pressed (button 1, 2, or 3).
See the Open Inventor C++ Reference Manual entry on SoEvent for a list of methods available for querying the event. In addition, you can use the following macros:
SO_MOUSE_PRESS_EVENT()—You pass in an SoEvent and a button number, and the macro returns TRUE if that button was pressed.
SO_MOUSE_RELEASE_EVENT()—You pass in an SoEvent and a button number, and the macro returns TRUE if that button was released.
SoKeyboardEvent contains information on which key was pressed (but does not indicate uppercase or lowercase).
 | Tip: Using the SoKeyboardEvent::getKey() method is the same as using XLookupKeysym() on an X key event. |
An SoLocation2Event is generated whenever the cursor moves. This event contains the absolute location of the cursor in window coordinates. (Window coordinates begin with (0, 0) at the lower left corner of the window.) An SoMotion3Event is generated whenever a 3D input device, such as the spaceball, moves. This event contains the rotation and translation relative to the device's previous position.
| Tip: Inventor events are extensible. If you have a device that does not correspond to existing SoEvent classes, you can create your own. (See The Inventor Toolmaker, Chapter 11.) |
As shown in Figure 10-1, SoSceneManager is a common class used to tie window-system–dependent render areas (such as SoXtRenderArea) to Inventor. The render area employs the scene manager to handle the scene graph. The scene manager handles both rendering and event processing and is independent of any particular window system.
In Inventor, events are distributed to the 3D objects contained in the scene database. Manipulator and dragger objects, described in detail in Chapter 15, are the 3D objects in the Inventor scene graph that handle events. Shape objects (such as sphere, cylinder, quad mesh), property objects (such as material and draw style), transformation objects, light objects, and camera objects ignore events. Finding the node that handles an event is discussed in “How Nodes Handle Events: SoHandleEventAction”.
With Inventor, you can choose from one of four event-handling mechanisms:
You can use Inventor's automatic event-handling mechanism, provided by the scene manager, in which certain kinds of nodes handle events (see “How Nodes Handle Events: SoHandleEventAction”). This is probably the easiest mechanism to use. (Note that you can also create your own nodes to handle events. You might create your own node if you want to use it in several different applications or
give it to other programmers. You could also create a new manipulator to handle events. See The Inventor Toolmaker for more information on creating new nodes and manipulators.)
You can use Inventor's event callback mechanism, in which user-written callback nodes handle events (see “Using Event Callback Nodes” ). This method handles events on a per-object basis and is fairly easy to implement. Its drawback is that, although the callback node does write to a file, it has no fields describing which path it is monitoring or which events it is interested in.
You can override Inventor's event-handling mechanisms entirely and pass all events directly to the application (see “Sending Events Directly to the Application”). Use this method if you prefer to work directly with X events and you do not need to handle events on a per-object basis. This method bypasses scene traversal and handles only window events.
You can use Inventor's generic callback mechanism in which user-written callback nodes handle all actions (see Chapter 17 for an example of an SoCallback node). Use this mechanism if you need to handle events and you want to implement another action, such as rendering. If you are only handling events, use Method 2 (the event callback node), because it does more work for you.
Methods 1, 2, and 4 are recommended because they are window-system–
independent and therefore more flexible. Methods 1 and 2 are probably the easiest.
(Advanced)
Inventor provides a mechanism for automatic event handling by “smart” nodes, which can be summarized as follows:
The render area registers interest in particular events with its window system.
The render area receives an event from its window system. (SoXtRenderArea receives an X event.)
The render area translates the event into an SoEvent.
The SoEvent is sent to the scene manager, which creates an instance of the SoHandleEventAction.
(Advanced)
The handle event action is applied to the top node of the scene graph. This action traverses the scene graph. Each node implements its own action behavior, as described in the following paragraphs. When a node is found to handle the event (typically a manipulator), the SoHandleEventAction stops traversing the scene graph and the node handles the event.
The following sections describe how different types of nodes implement SoHandleEventAction.
SoNode, the base class for all nodes, does nothing for the handle event action. Therefore, all properties, transforms, shapes, cameras, and lights do nothing for this action.
When the handle event action is applied to an SoGroup, the group traverses its children from left to right, asking each child to handle the event. After each child, it checks to see if the event was handled. If it was, the handle event action ends its traversal of the scene graph. If the event was not handled, the SoGroup asks the next child to handle the event.
The SoGroup uses the isHandled() method of SoHandleEventAction to find out if an event has been handled. When a node handles an event, it calls setHandled() on the handle event action.
Manipulators are the “smart” objects in the scene graph that handle certain kinds of events (see Chapter 15 for a more detailed discussion). Typically, a manipulator replaces a node in the scene graph with an editable version of that node. Using SoHandleBoxManip, you can change an object's size and position by replacing the transform node in the scene graph that affects the object with the handle-box manipulator. This manipulator then scales and translates itself in response to the user moving the mouse. Using SoTrackballManip, you can rotate an object around a center point by replacing the appropriate transform node in the scene graph with a
trackball manipulator. This manipulator then changes its rotation field in response to the user moving the mouse.
Manipulators, such as the trackball and handle box, require picking information in addition to the event type. These manipulators call getPickedPoint() on SoHandleEventAction to see which object was picked. If the manipulator was picked, it handles the event. You can also create manipulators that do not require a hit on their geometry to be activated. (See The Inventor Toolmaker, Chapter 8, for information on creating your own manipulator.)
A node can request that all subsequent events be sent directly to it until further notice. This request is called grabbing. For example, after receiving a mouse-button-down event, a manipulator might grab all subsequent events until a mouse-button-up event occurs. The setGrabber() method is called on the handle event action, with a pointer to the manipulator (this):
handleEA->setGrabber(this); |
The handle event action now applies the action directly to the grabbing node instead of to the scene graph root. To stop grabbing events, the manipulator uses the releaseGrabber() method:
handleEA->releaseGrabber(); |
If the node calls releaseGrabber() for an event but did not handle the event, the handle event action initiates a traversal at the root and passes the event to the entire scene graph. For example, manipulators grab after a mouse-
press event. However, if a mouse release occurs with no mouse motion in between, the manipulator ungrabs and does not handle the event. The event is then passed to the scene graph for processing.
The getGrabber() method returns the node that is currently grabbing events. (See SoHandleEventAction in the Open Inventor C++ Reference Manual.)
 | Note: Grabbing events in the scene graph does not perform an X server grab. |
An SoSelection node, derived from SoGroup, is typically inserted near the top of the scene graph, as shown in Figure 10-3. When the handle event action is applied to an SoSelection node, it traverses its children in the same way as SoGroup. However, if none of its children handles the event, the selection node itself handles it.
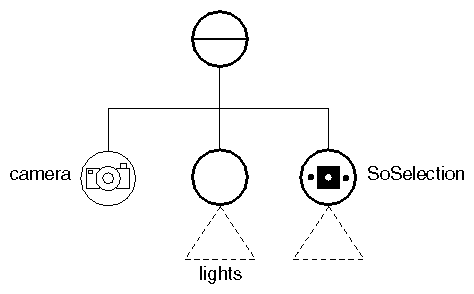
When a left-mouse-button event occurs, the SoSelection object needs to know which node was picked. It calls the getPickedPoint() method on the handle event action. (SoSelection checks the picked object on both mouse-down and mouse-up events to make sure that both events occurred over the same object. Specify FALSE for the setPickMatching() method to disable this feature, and SoSelection will get the picked point only on mouse-up events.)
The handle event action performs the pick the first time a node in the scene graph requests information concerning the hit objects (picking is performed only when necessary). SoHandleEventAction caches this picking information so that any subsequent nodes encountered during traversal, such as manipulators and the selection object, can have access to this information quickly. Only one pick (at most) is performed during the traversal for SoHandleEventAction.
After receiving the pick information, the SoSelection class implements the appropriate selection policy. Currently, you can choose one of three
selection policies with the policy field. SoSelection keeps track of the selection list for you. Selected objects can be highlighted by the render area (see “Highlighting Selected Objects”). The default selection policy, SoSelection::SHIFT, is as follows:
If the user clicks the left mouse button on a node, SoSelection clears the selection list and adds the node to the list.
If the user clicks the left mouse button on a node while pressing the Shift key, SoSelection toggles the node's selection status (that is, if the node is currently in the selection list, it is removed from the list; if the node is not currently selected, it is added to the selection list).
If the user clicks the left mouse button on nothing, SoSelection clears the selection list.
With the SoSelection::SINGLE policy, only one object can be selected at a time. This policy is as follows:
If the user clicks the left mouse button on a node, SoSelection clears the selection list and adds the node to the list.
If the user clicks the left mouse button on nothing, SoSelection clears the selection list.
With the SoSelection::TOGGLE policy, multiple objects can be selected at a time. This policy is as follows:
If the user clicks the left mouse button on a node, SoSelection toggles that node's selection status (that is, it adds the node to the list if it was not previously selected, or it removes the node from the list if it was previously selected).
If the user clicks the left mouse button on nothing, SoSelection does nothing.
| Tip: Shift selection is the same as Single selection when the Shift key is not pressed, and Toggle selection when the Shift key is pressed. |
If none of these selection policies meets your needs, you can implement your own custom selection policy by creating an event callback node and passing it a pointer to the SoSelection node. You can then call select(), deselect(), toggle(), and deselectAll() on the SoSelection node to implement your new selection policy. An additional alternative is to derive your own class from SoSelection.
See “Selection” for more information on the selection list.
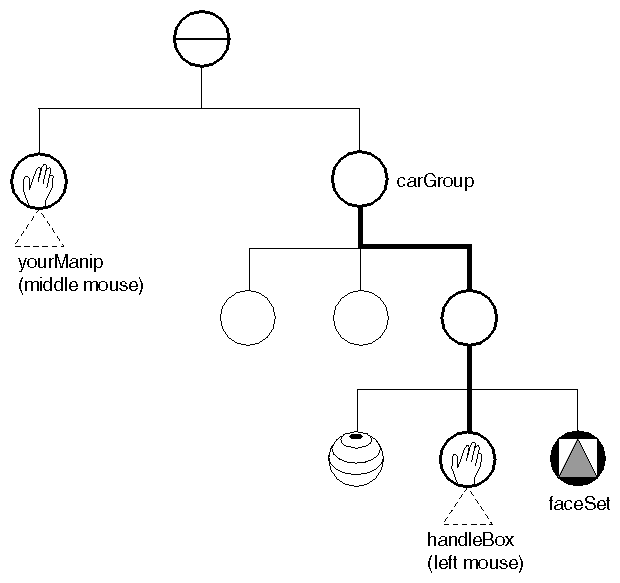
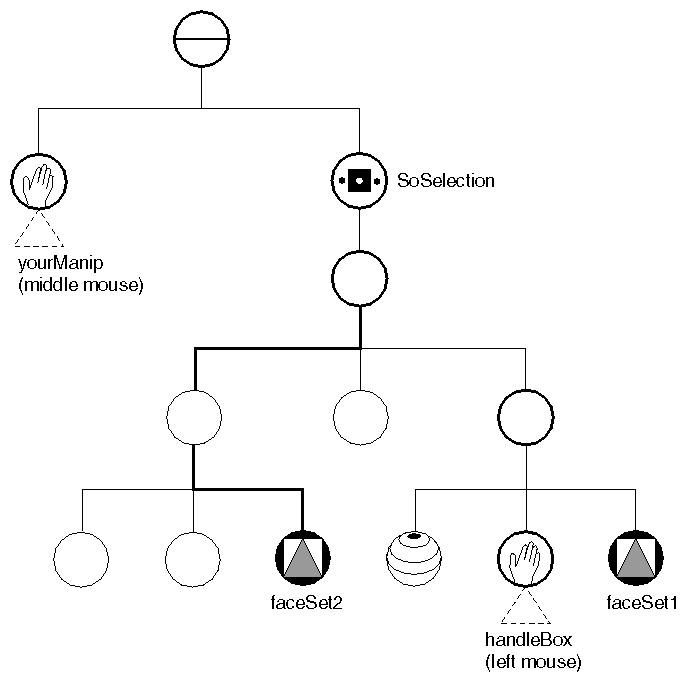
The following example illustrates the process of finding the event handler for a given event. Assume you have a scene graph containing several shape objects, with a handle-box manipulator that affects the transformation of an indexed face set. The scene graph also contains yourManip, a manipulator you've written that handles the middle mouse-button event. This scene graph is shown in Figure 10-4.
If the user clicks the left mouse button on the handle box surrounding the face-set object on the screen, the scene manager receives the event and sends it to the SoHandleEventAction with the setEvent() method. Here is how the nodes in Figure 10-4 respond during the handle event action traversal:
The SoSeparator group asks each child, from left to right in the scene graph, to handle the event.
The yourManip node does not handle the event, since it handles only middle mouse-button events.
The carGroup node traverses each of its children, from left to right, and asks them to handle the event. The third child, also a group, traverses its children from left to right.
The handle-box manipulator node, which handles left mouse events, needs to know if it is in the picked path. It calls getPickedPoint() on the SoHandleEventAction. Since it was hit, it then calls setHandled() and handles the event.
In Figure 10-5, the scene graph contains a new instance of a face set (faceSet2). Suppose the user clicks on this face set instead of the handle box surrounding faceSet1. Since the handle-box manipulator is not contained in the pick path and has no effect on the pick path, it does not handle the event. In this case, the SoSelection object handles the event.
If you require an event-handling behavior that is not provided by Inventor manipulators, you can create your own manipulator, or you can write your own event handler using an event callback node. Creating new manipulators is discussed in The Inventor Toolmaker, Chapter 8. Using event callback nodes is discussed in this section.
An event callback node contains a user-written function that is invoked whenever an event of a specified type occurs, when the specified path is picked, and when the handle event action traverses the event callback node. If no path is specified (that is, NULL), the event callback function is invoked automatically every time an event of the specified type occurs and the node is traversed by the handle event action. You can write multiple event callback functions and add them to the list of callback functions maintained by the SoEventCallback node.
To specify which SoEvents the callback node is interested in and to specify the callback, use the addEventCallback() method:
SoEventCallback *eventCB = new SoEventCallback;
eventCB->addEventCallback(SoKeyboardEvent::getClassTypeId(),
         myCallbackFunc, userData);
|
To specify the path to be monitored, use the setPath() method.
When the callback function is invoked, it is passed the user data and a pointer to the instance of SoEventCallback. To remove a callback function from the event callback list, use the removeEventCallback() method.
| Tip: To have your callback invoked for every event type, pass SoEvent::getClassTypeId() as the type. |
The SoHandleEventAction, discussed earlier in this chapter, does its work behind the scenes when you use event callback functions. It performs a pick when necessary and caches the pick information. The event callback function itself is responsible for setting whether the event was handled (with the setHandled() method). If there are multiple event callback functions in an event callback node, all of them are invoked, regardless of whether one of them has handled the event.
The event callback function can use any of the following methods on SoEventCallback, which parallel those used in standard Inventor event handling:
Example 10-1 shows the use of event callback functions with the SoEventCallback node. It creates an event callback node that is interested in key-press events. The callback function, myKeyPressCB, is then registered with the addEventCallback() method. The scene graph has four objects that can be selected by picking with the left mouse button. (Use the Shift key to extend the selection to more than one object.) When a key-press occurs, it checks to see if the up or down arrow is pressed and scales the picked object up or down accordingly.
// An event callback node so we can receive key press events
SoEventCallback *myEventCB = new SoEventCallback;
myEventCB->addEventCallback(
         SoKeyboardEvent::getClassTypeId(),
         myKeyPressCB, selectionRoot);
selectionRoot->addChild(myEventCB);

...

// userData is the selectionRoot from main().
void
myKeyPressCB(void *userData, SoEventCallback *eventCB)
{
   SoSelection *selection = (SoSelection *) userData;
   const SoEvent *event = eventCB->getEvent();

   // Check for the Up and Down arrow keys being pressed.
   if (SO_KEY_PRESS_EVENT(event, UP_ARROW)) {
      myScaleSelection(selection, 1.1);
      eventCB->setHandled();
   } else if (SO_KEY_PRESS_EVENT(event, DOWN_ARROW)) {
      myScaleSelection(selection, 1.0/1.1);
      eventCB->setHandled();
   }
}
|
In some cases, you may want to short-circuit Inventor event handling and send all events directly to the application. SoXtRenderArea contains a method that enables you to pass events to an application event handler. For example:
SoXtRenderArea *myRenderArea; myRenderArea->setEventCallback(myEventCallback, userData); |
When this method is passed a non-NULL user function, all events that come into the render area are passed to the user function. The callback function returns a Boolean value. If this value is TRUE, the callback function handled the event and the render area does not send the event to the scene manager for handling. If this value is FALSE, the event is sent to the scene graph for handling.
Note that the events sent to the event callback function are not Inventor events. For the SoXtRenderArea, X events are passed. The application is thus assured of receiving every event, even those that do not translate to Inventor events.
Example 10-2 demonstrates using setEventCallback(), which causes events to be sent directly to the application without being sent into the scene graph.
// Clicking the left mouse button and dragging will draw
// points in the xy plane beneath the mouse cursor.
// Clicking middle mouse and holding causes the point set
// to rotate about the Y axis.
// Clicking right mouse clears all points drawn so far out
// of the point set.
...
// Have render area send events to us instead of the scene
// graph.  We pass the render area as user data.
myRenderArea->setEventCallback(
            myAppEventHandler, myRenderArea);

SbBool
myAppEventHandler(void *userData, XAnyEvent *anyevent)
{
   SoXtRenderArea *myRenderArea = (SoXtRenderArea *) userData;
   XButtonEvent *myButtonEvent;
   XMotionEvent *myMotionEvent;
   SbVec3f vec;
   SbBool handled = TRUE;

   switch (anyevent->type) {

   case ButtonPress:
      myButtonEvent = (XButtonEvent *) anyevent;
      if (myButtonEvent->button == Button1) {
         myProjectPoint(myRenderArea,
                  myButtonEvent->x, myButtonEvent->y, vec);
         myAddPoint(myRenderArea, vec);
      } else if (myButtonEvent->button == Button2) {
         myTicker->schedule();  // start spinning the camera
      } else if (myButtonEvent->button == Button3) {
         myClearPoints(myRenderArea);  // clear the point set
      }
      break;

   case ButtonRelease:
      myButtonEvent = (XButtonEvent *) anyevent;
      if (myButtonEvent->button == Button2) {
         myTicker->unschedule();  // stop spinning the camera
      }
      break;

   case MotionNotify:
      myMotionEvent = (XMotionEvent *) anyevent;
      if (myMotionEvent->state & Button1Mask) {
         myProjectPoint(myRenderArea,
                  myMotionEvent->x, myMotionEvent->y, vec);
         myAddPoint(myRenderArea, vec);
      }
      break;

   default:
      handled = FALSE;
      break;
   }

   return handled;
}
|
The SoSelection node provides several additional features that relate to the topic of user interaction. These features include managing the selection list (introduced in “Selection Policy”), highlighting the selected objects, and the use of user-written callback functions that are invoked when the selection list changes. The following sections describe each of these features.
The SoSelection node keeps a list of paths to objects that have been selected. This list is called the selection list. Typically, the user selects an object or objects and then performs an operation on the selected objects, such as copying them, deleting them, or setting their color.
Each path in the selection list begins with the selection node and ends with the selected object. Objects can be added to and removed from the selection list in one of two ways:
By the event-processing mechanism of the selection object itself. This mechanism is based on the current selection policy.
By methods on SoSelection that allow you to select, deselect, toggle, and clear objects from the selection list. You need to use these methods only if you want to manage the selection list directly.
The methods on SoSelection that are available for direct management of the selection list are as follows:
For convenience, you can provide these methods with a node instead of a path. If the node is instanced multiple times in the scene graph, the path to the first instance of the node is used.
For example, suppose each of the objects in the scene graph has a name associated with it, such as a car part. The user selects the object by clicking on a name from a list displayed on the screen (“hubcap”). Your program then uses this name, finds the path to the selected object, and adds this path to the selection list. Example 10-3 shows using a Motif-style list to select objects in this manner. This example shows selecting and deselecting objects using a Motif-style list that contains names for four objects (cube, sphere, cone, cylinder).
//  The scene graph has 4 objects which may be
//  selected by picking with the left mouse button
//  (use shift key to extend the selection to more
//  than one object).
//
//  Hitting the up arrow key will increase the size of
//  each selected object; hitting down arrow will decrease
//  the size of each selected object.
//
//  This also demonstrates selecting objects from a Motif-style
//  list, and calling select/deselect functions on the
//  SoSelection node to change the selection. Use the Shift
//  key to extend the selection (i.e. pick more than one
//  item in the list.)
...
enum objects {
        CUBE,
        SPHERE,
        CONE,
        CYL,
        NUM_OBJECTS
};

static char *objectNames[] = {
        "Cube",
        "Sphere",
        "Cone",
        "Cylinder"
};
...
   cube->setName(objectNames[CUBE]);
   sphere->setName(objectNames[SPHERE]);
   cone->setName(objectNames[CONE]);
   cyl->setName(objectNames[CYL]);
...
   // Create a table of object names
   XmString *table = new XmString[NUM_OBJECTS];
   for (i=0; i<NUM_OBJECTS; i++) {
       table[i] = XmStringCreate(objectNames[i],
                                 XmSTRING_DEFAULT_CHARSET);
   }

   // Create the list widget
   n = 0;
   XtSetArg(args[n], XmNitems, table);
   n++;
   XtSetArg(args[n], XmNitemCount, NUM_OBJECTS);
   n++;
   XtSetArg(args[n], XmNselectionPolicy, XmEXTENDED_SELECT);
   n++;

   motifList = XmCreateScrolledList(shell, "funcList", args, n);
   XtAddCallback(motifList, XmNextendedSelectionCallback,
      (XtCallbackProc) myListPickCB, (XtPointer) selection);
...
   // Clear the selection node, then loop through the list
   // and reselect
   selection->deselectAll();

   // Update the SoSelection based on what is selected in
   // the list.  We do this by extracting the string
   // from the selected XmString, and searching for the
   // object of that name.
   for (int i = 0; i < listData->selected_item_count; i++) {
      mySearchAction.setName(
               SoXt::decodeString(listData->selected_items[i]));
      mySearchAction.apply(selection);
      selection->select(mySearchAction.getPath());
   }
|
Another example of how the selection list might be used is that the user selects several objects and wants to make all of them twice their original size. Here, you would call getList() or getPath() for each of the selected objects. Then you would find the appropriate SoTransform node in the path for each object and modify its scaleFactor field. Example 10-4 is an example of using the selection list in this way.
// Scale each object in the selection list
void
myScaleSelection(SoSelection *selection, float sf)
{
   SoPath *selectedPath;
   SoTransform *xform;
   SbVec3f scaleFactor;
   int i,j;

   // Scale each object in the selection list

   for (i = 0; i < selection->getNumSelected(); i++) {
      selectedPath = selection->getPath(i);
      xform = NULL;

      // Look for the shape node, starting from the tail of the
      // path.  Once we know the type of shape, we know which
      // transform to modify
      for (j=0; j < selectedPath->getLength() &&
                (xform == NULL); j++) {
         SoNode *n = (SoNode *)selectedPath->getNodeFromTail(j);
         if (n->isOfType(SoCube::getClassTypeId())) {
            xform = cubeTransform;
         } else if (n->isOfType(SoCone::getClassTypeId())) {
            xform = coneTransform;
         } else if (n->isOfType(SoSphere::getClassTypeId())) {
            xform = sphereTransform;
         } else if (n->isOfType(SoCylinder::getClassTypeId())) {
            xform = cylTransform;
         }
      }
      // Apply the scale
      scaleFactor = xform->scaleFactor.getValue();
      scaleFactor *= sf;
      xform->scaleFactor.setValue(scaleFactor);
   }
}
|
Usually, when objects are selected, they are highlighted or treated in some other special way to distinguish them from unselected objects. With the SoXtRenderArea, Inventor provides two highlight styles. You can choose to have highlighted objects drawn in wireframe with a particular color, line pattern, and line width, or you can have selected objects drawn with a wireframe bounding box surrounding each object. The type of highlight can be set on SoXtRenderArea. The default highlight style is no highlight.
Figure 10-6 shows the class tree for the highlighting classes. Because highlighting objects are simply another way to render the scene, Inventor highlights are derived from the SoGLRenderAction. To create your own custom highlights, see The Inventor Toolmaker, Chapter 11.

To specify which highlight to use, pass a highlight to the setGLRenderAction() method on SoXtRenderArea. The action will render highlights for selected objects in the scene. Note that whenever you create a new highlight and pass it to the render area, you are responsible for deleting the highlight after the render area is destroyed. The render area will not delete it for you.
First, the highlight render action renders the scene graph. Then it renders the path for each object in the selection list. For SoLineHighlightRender-
Action, the selected objects are drawn in wireframe, with the specified color, line pattern, and line width. The following methods are available for SoLineHighlightRenderAction:
| setColor (color) | specifies the highlight color | |
| setLinePattern (pattern) |
| |
| setLineWidth (width) |
|
For SoBoxHighlightRenderAction, the selected objects are drawn with a wireframe box surrounding them, using the specified color, line pattern, and line width. Methods for SoBoxHighlightRenderAction are the same as for SoLineHighlightRenderAction.
If you want highlight styles other than the line and box highlight styles provided by Inventor, you can do either of the following:
Create a new subclass from SoGLRenderAction and pass it to
renderArea->setGLRenderAction()Specify NULL for addSelectionHighlight() and then use selection callback functions, described in the following section, to add geometry, draw-style, and other required nodes to the scene graph for highlighting selected objects. A common highlighting technique is to use selection callbacks to add a manipulator to selected objects.
See The Inventor Toolmaker, Chapter 10, for a detailed explanation of creating your own highlight.
The SoSelection class has several types of callback functions associated with it: selection callbacks, deselection callbacks, a pick filter callback, start callbacks, and finish callbacks. For example, you might write a callback function that puts a trackball around an object every time it is selected. This function would be a selection callback function. You would probably write a second callback function to remove the trackball when the object is deselected. This function would be a deselection callback function. The pick filter callback function is invoked whenever an object is picked and is about to be selected or deselected. This function allows you to truncate the selection path at a certain object type, such as a node kit (see Example 10-8).
A start callback function is called whenever the selection is about to change, and a finish callback function is called when the selection is finished changing. These functions are useful for implementing undo and redo features. When the selection is about to change, you can save the current selection in an undo buffer. To undo a change, you restore this saved information.
Another example of a user callback function for selected objects would be a function that checks to see if the material editor is on the screen when an object is selected. If it is, then the function finds the material node affecting the selected object and attaches the material editor to that node.
The following methods allow you to specify what happens when an object is selected and deselected:
| addSelectionCallback(functionName, userData) |
| |
| addDeselectionCallback(functionName, userData) removeDeselectionCallback(functionName, userData) | are invoked whenever an object is deselected. | |
| setPickFilterCallback(functionName, userData) |
| |
| addStartCallback(functionName, userData) |
| |
| addFinishCallback(functionName, userData) |
|
These methods allow you to pass in a callback function and a pointer to user data. If you specify NULL for the pick filter callback function, whatever is picked will be selected and deselected.
Example 10-5 illustrates the use of selection callback functions. The scene graph in this example has a sphere and a 3D text object. A selection node is placed at the top of the scene graph. When an object is selected, a selection callback is invoked to change the material color of that object.
#include <X11/Intrinsic.h>
#include <Inventor/Sb.h>
#include <Inventor/SoInput.h>
#include <Inventor/Xt/SoXt.h>
#include <Inventor/Xt/SoXtRenderArea.h>
#include <Inventor/nodes/SoDirectionalLight.h>
#include <Inventor/nodes/SoMaterial.h>
#include <Inventor/nodes/SoPerspectiveCamera.h>
#include <Inventor/nodes/SoPickStyle.h>
#include <Inventor/nodes/SoSelection.h>
#include <Inventor/nodes/SoSphere.h>
#include <Inventor/nodes/SoText3.h>
#include <Inventor/nodes/SoTransform.h>

// global data
SoMaterial *textMaterial, *sphereMaterial;
static float reddish[] = {1.0, 0.2, 0.2};
static float white[] = {0.8, 0.8, 0.8};

// This routine is called when an object gets selected.
// We determine which object was selected, and change
// that object's material color.
void
mySelectionCB(void *, SoPath *selectionPath)
{
   if (selectionPath->getTail()->
            isOfType(SoText3::getClassTypeId())) {
      textMaterial->diffuseColor.setValue(reddish);
   } else if (selectionPath->getTail()->
            isOfType(SoSphere::getClassTypeId())) {
      sphereMaterial->diffuseColor.setValue(reddish);
   }
}

// This routine is called whenever an object gets deselected.
// We determine which object was deselected, and reset
// that object's material color.
void
myDeselectionCB(void *, SoPath *deselectionPath)
{
   if (deselectionPath->getTail()->
            isOfType(SoText3::getClassTypeId())) {
      textMaterial->diffuseColor.setValue(white);
   } else if (deselectionPath->getTail()->
            isOfType(SoSphere::getClassTypeId())) {
      sphereMaterial->diffuseColor.setValue(white);
   }
}

void
main(int argc, char **argv)
{
   // Initialize Inventor and Xt
   Widget myWindow = SoXt::init(argv[0]);
   if (myWindow == NULL) exit(1);

   // Create and set up the selection node
   SoSelection *selectionRoot = new SoSelection;
   selectionRoot->ref();
   selectionRoot->policy = SoSelection::SINGLE;
   selectionRoot-> addSelectionCallback(mySelectionCB);
   selectionRoot-> addDeselectionCallback(myDeselectionCB);

   // Create the scene graph
   SoSeparator *root = new SoSeparator;
   selectionRoot->addChild(root);

   SoPerspectiveCamera *myCamera = new SoPerspectiveCamera;
   root->addChild(myCamera);
   root->addChild(new SoDirectionalLight);

   // Add a sphere node
   SoSeparator *sphereRoot = new SoSeparator;
   SoTransform *sphereTransform = new SoTransform;
   sphereTransform->translation.setValue(17., 17., 0.);
   sphereTransform->scaleFactor.setValue(8., 8., 8.);
   sphereRoot->addChild(sphereTransform);

   sphereMaterial = new SoMaterial;
   sphereMaterial->diffuseColor.setValue(.8, .8, .8);
   sphereRoot->addChild(sphereMaterial);
   sphereRoot->addChild(new SoSphere);
   root->addChild(sphereRoot);

   // Add a text node
   SoSeparator *textRoot = new SoSeparator;
   SoTransform *textTransform = new SoTransform;
   textTransform->translation.setValue(0., -1., 0.);
   textRoot->addChild(textTransform);

   textMaterial = new SoMaterial;
   textMaterial->diffuseColor.setValue(.8, .8, .8);
   textRoot->addChild(textMaterial);
   SoPickStyle *textPickStyle = new SoPickStyle;
   textPickStyle->style.setValue(SoPickStyle::BOUNDING_BOX);
   textRoot->addChild(textPickStyle);
   SoText3 *myText = new SoText3;
   myText->string = "rhubarb";
   textRoot->addChild(myText);
   root->addChild(textRoot);

   SoXtRenderArea *myRenderArea = new SoXtRenderArea(myWindow);
   myRenderArea->setSceneGraph(selectionRoot);
   myRenderArea->setTitle("My Selection Callback");
   myRenderArea->show();

   // Make the camera see the whole scene
   const SbViewportRegion myViewport =
            myRenderArea->getViewportRegion();
   myCamera->viewAll(root, myViewport, 2.0);

   SoXt::show(myWindow);
   SoXt::mainLoop();
}
|
The pick filter callback returns a path for the new object to be selected, deselected, or toggled:
typedef SoPath *SoSelectionPickCB( void *userData, SoDetail *d); void setPickFilterCallback(SoSelectionPickCB *f, void *userData = NULL, SbBool callOnlyIfSelectable = TRUE); |
This callback can look at the picked point to see what was picked and return a path to whatever the selection policy is to be applied to. It can truncate the picked path so that it ends in a particular type of node. If an unselectable object is picked, the pick filter callback determines how that information is used. When the callback is set, the application passes in a Boolean value that specifies whether the callback is called only if the object is selectable, or is called for all objects. The pick filter callback can then return one of the following:
NULL—the selection behaves as if nothing were picked (for SINGLE and SHIFT selection policies, this clears the selection list).
Path—this path will be selected or deselected according to the selection policy. It must pass through the selection node.
Path not passing through the selection node—the selection ignores this pick event and no change is made to the selection list.
Path containing only the selection node—applies the selection policy as though nothing were picked, but continues traversal.
Examples 10-6 through 10-8 illustrate sample pick filter callbacks the application could use.
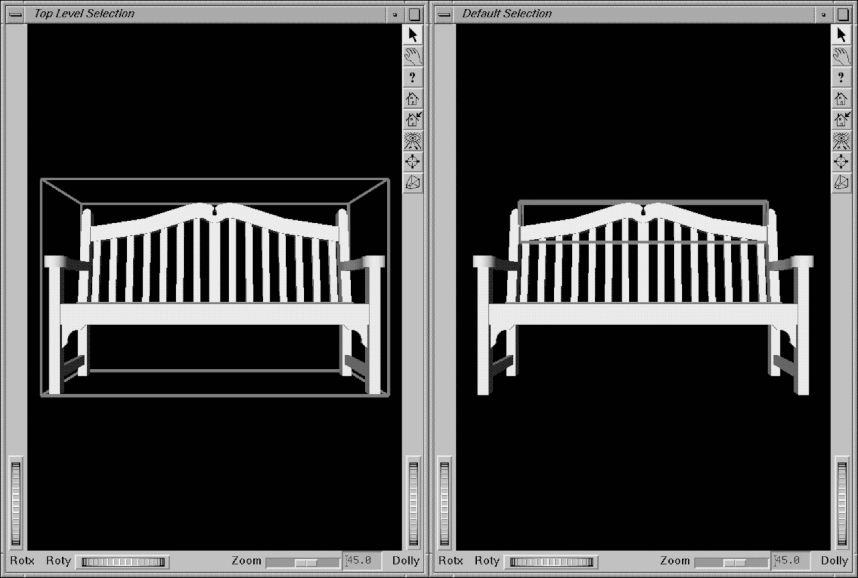
Example 10-6 shows the use of the pick filter callback to implement a top-level selection policy. Rather than selecting the actual node that was picked, it always selects the topmost group beneath the selection node. Figure 10-7 shows the two viewers created by this example.
#include <X11/StringDefs.h>
#include <X11/Intrinsic.h>

#include <Inventor/SoDB.h>
#include <Inventor/SoInput.h>
#include <Inventor/SoPath.h>
#include <Inventor/Xt/SoXt.h>
#include <Inventor/Xt/viewers/SoXtExaminerViewer.h>
#include <Inventor/actions/SoBoxHighlightRenderAction.h>
#include <Inventor/misc/SoPickedPoint.h>
#include <Inventor/nodes/SoSelection.h>

// Pick the topmost node beneath the selection node
SoPath *
pickFilterCB(void *, const SoPickedPoint *pick)
{
   // See which child of selection got picked
   SoPath *p = pick->getPath();
   int i;
   for (i = 0; i < p->getLength() - 1; i++) {
      SoNode *n = p->getNode(i);
      if (n->isOfType(SoSelection::getClassTypeId()))
         break;
   }
   // Copy 2 nodes from the path:
   // selection and the picked child
   return p->copy(i, 2);
}


void
main(int argc, char *argv[])
{
   // Initialization
   Widget mainWindow = SoXt::init(argv[0]);

   // Open the data file
   SoInput in;
   char *datafile = "parkbench.iv";
   if (! in.openFile(datafile)) {
      fprintf(stderr, "Cannot open %s for reading.\n",
              datafile);
      return;
   }

   // Read the input file
   SoNode *n;
   SoSeparator *sep = new SoSeparator;
   while ((SoDB::read(&in, n) != FALSE) && (n != NULL))
      sep->addChild(n);

   // Create two selection roots - one will use the pick filter.
   SoSelection *topLevelSel = new SoSelection;
   topLevelSel->addChild(sep);
   topLevelSel->setPickFilterCallback(pickFilterCB);

   SoSelection *defaultSel = new SoSelection;
   defaultSel->addChild(sep);

   // Create two viewers, one to show the pick filter for top
   // level selection, the other to show default selection.
   SoXtExaminerViewer *viewer1 = new
            SoXtExaminerViewer(mainWindow);
   viewer1->setSceneGraph(topLevelSel);
   viewer1->setGLRenderAction(new SoBoxHighlightRenderAction());
   viewer1->redrawOnSelectionChange(topLevelSel);
   viewer1->setTitle("Top Level Selection");

   SoXtExaminerViewer *viewer2 = new SoXtExaminerViewer();
   viewer2->setSceneGraph(defaultSel);
   viewer2->setGLRenderAction(new SoBoxHighlightRenderAction());
   viewer2->redrawOnSelectionChange(defaultSel);
   viewer2->setTitle("Default Selection");

   viewer1->show();
   viewer2->show();

   SoXt::show(mainWindow);
   SoXt::mainLoop();
}
|
Example 10-7 shows the use of the pick filter callback to pick through manipulators. In the complete example, the scene graph contains the text “Open Inventor.” Clicking the left mouse on an object selects it and adds a manipulator to it. Clicking again deselects it and removes the manipulator. The pick filter is used to deselect the object rather than select the manipulator.
SoPath *
pickFilterCB(void *, const SoPickedPoint *pick)
{
   SoPath *filteredPath = NULL;

   // See if the picked object is a manipulator.
   // If so, change the path so it points to the object the
   // manip is attached to.
   SoPath *p = pick->getPath();
   SoNode *n = p->getTail();
   if (n->isOfType(SoTransformManip::getClassTypeId())) {
      // Manip picked! We know the manip is attached
      // to its next sibling. Set up and return that path.
      int manipIndex = p->getIndex(p->getLength() - 1);
      filteredPath = p->copy(0, p->getLength() - 1);
      filteredPath->append(manipIndex + 1); // get next sibling
   }
   else filteredPath = p;

   return filteredPath;
}
|
Example 10-8 illustrates using the pick filter callback to truncate the pick path at a node kit. This filter facilitates editing the attributes of objects because the node kit takes care of the part creation details.
// Truncate the pick path so a nodekit is selected
SoPath *
pickFilterCB(void *, const SoPickedPoint *pick)
{
   // See which child of selection got picked
   SoPath *p = pick->getPath();
   int i;
   for (i = p->getLength() - 1; i >= 0; i--) {
      SoNode *n = p->getNode(i);
      if (n->isOfType(SoShapeKit::getClassTypeId()))
         break;
   }

   // Copy the path down to the nodekit
   return p->copy(0, i+1);
}
|