Chapter Objectives
After reading this chapter, you'll be able to do the following:
Draw, or render, all or part of a scene graph
Print a scene graph
Create a texture map from a rendering of a scene graph
Compute a 3D bounding box for objects in a scene graph
Compute a cumulative transformation matrix (and its inverse) for objects in a scene graph
Write a scene graph to a file
Search for nodes, types of nodes, or nodes with specific names in a scene graph
Pick objects in a scene graph and obtain information about them
Perform your own action by writing callback functions that can be invoked during scene graph traversal
Write callback functions that use the primitives (points, lines, triangles) generated by Inventor shapes
This chapter describes how actions are applied to an Inventor scene graph. Earlier chapters introduced you to the most commonly used action, GL rendering, which traverses the scene graph and draws it using the OpenGL Library. This chapter outlines a general model for performing any action and highlights important concepts related to other Inventor actions, including picking, calculating a bounding box, calculating a transformation matrix, writing to a file, and searching the scene graph for certain nodes.
The preceding chapters focused on building a scene graph using group, property, and shape nodes. Once you have created this scene graph, you can apply actions to it. Table 9-1 summarizes some of the ways you can use the scene graph and the specific Inventor action to use.
Table 9-1. Using Inventor Actions
You Can Perform This Task | Using This Action |
|---|---|
Draw, or render, the scene graph | |
Compute a 3D bounding box for objects in the scene graph | |
Compute a cumulative transformation matrix (and its inverse) | |
Write the scene graph to a file | SoWriteAction |
Search for paths to specific nodes, types of nodes, or nodes with specific names in the scene graph | |
Allow objects in the scene graph to handle an event (see Chapter 10) | |
Pick objects in the scene graph along a ray | |
Traverse the scene graph and accumulate traversal state, then perform your own action using callback functions |
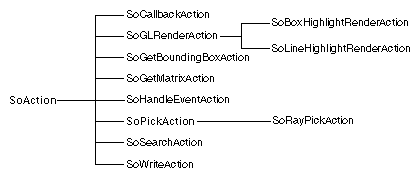
Figure 9-1 shows the portion of the class tree for actions.
Performing any action on the scene graph follows the general model described in this section.
Initialize the action by constructing an instance of the action class. You can construct the action on the stack as follows:
	SbViewportRegion region(300, 200);
	SoGLRenderAction renderAction(region);
You can also use the new operator to allocate an instance of the action:
renderAction = new SoGLRenderAction(region);
If you create the action with new, don't forget to delete the action when you finish using it.
Set up special parameters for the action. For example, the constructor for SoGLRenderAction allows you to specify the viewport region as well as whether to inherit the current OpenGL settings. If you specify
SoGLRenderAction renderAction(region, TRUE);
you can use the current OpenGL values for line width, material, and so on. If you specify FALSE (or omit this parameter), Inventor sets up its own defaults.Apply the action to a node, a path, or a path list. For example:
renderAction->apply(root);Obtain the results of the action, if applicable. Some actions have additional methods that can be used with them. For example, the SoGetBoundingBoxAction has one method, getBoundingBox(), that returns the bounding box computed by the action and another method, getCenter(), that returns the computed center.
When an action is applied to a scene graph, each node encountered in the graph implements its own action behavior. In some cases, a particular type of node does nothing for a particular action. SoMaterial does nothing when an SoGetBoundingBoxAction is applied, for example. In other cases, the action behavior is relatively simple. For example, for most actions, all classes derived from SoGroup do little except traverse their children in a specified order.
When an action is applied, the Inventor database manages a traversal state (similar to the rendering state of OpenGL). The traversal state is an internal class used by Inventor to store transient state elements (parameters) during execution of the action. Typically, this management involves traversing the scene graph from top to bottom and from left to right. The elements in the traversal state are modified by the nodes encountered during this traversal. For certain actions, such as writing to a file (SoWriteAction) and accumulating a transformation matrix (SoGetMatrixAction), little or no traversal state is maintained. In these cases, the database does not need to keep track of all parameters inherited by nodes lower in the graph from the nodes above them.
The following sections focus on individual actions and how they are implemented by different nodes. You don't need to worry about exactly how the database manages the traversal state. You need only a general idea of which nodes implement a given action and how they implement it.
An action can be applied to a node, a path, or a path list. When an action is applied to a node, the graph rooted by that node is traversed. When the action is applied to a path, all nodes in the path chain itself are traversed, as well as all nodes, if any, under the last node in the path. In addition, all nodes that affect the nodes in the path chain are also traversed (typically, these nodes are to the left and above the nodes in the path). Applying an action to a path list is similar to applying the action to each path, except that subgraphs common to two or more paths are traversed only once.
Chapters 3 through 8 illustrated how different nodes implement the SoGLRenderAction. This action draws the objects represented by a scene graph. Here is how various nodes implement the SoGLRenderAction:
If the node is a group node, it visits each of its children in a specified order. If it is an SoSeparator node, it saves the traversal state before traversing its children and restores it after traversing its children.
If the node is a property node, it often replaces a value in the corresponding element of the traversal state (other property nodes, such as SoTransform, may have different behaviors). For example:
SoMaterial replaces the values for the current material.
SoLightModel replaces the values for the current lighting model.
SoDrawStyle replaces the values for the current drawing style.
SoCoordinate3 replaces the values for the current coordinates.
If the node is derived from SoTransformation, it modifies the current transformation matrix. Each new set of values is preconcatenated onto the existing transformation matrix.
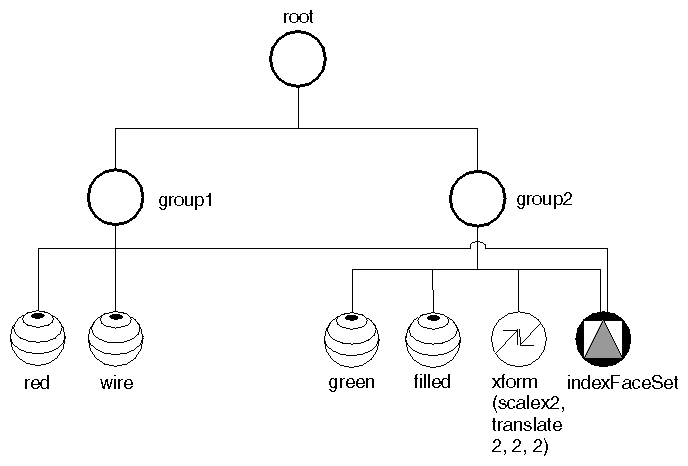
If the node is a shape node, it causes its shape to be drawn, using the current elements in the traversal state. Figure 9-2 shows an indexed face set instanced in two different groups. When rendered as part of group1, it uses the current elements of the traversal state, causing a red wireframe face set to be drawn. Because subsequent nodes in group2 modify the current material, drawing style, and transformation matrix, the next instance of the indexed face set, later in the graph, appears green and filled. It is also twice as big as the red face set and translated to a new location.
Use the setTransparencyType() method of the render action to specify the quality of rendering for transparent objects. Inventor uses three general types of transparency rendering. Screen-door transparency uses a fill pattern to simulate transparency. Additive blending adds the transparent object to the colors already in the frame buffer. Alpha blending uses a multiplicative algorithm for combining source and destination colors and alpha factor. Within these general categories, there are three types of additive blending and three types of alpha blending, depending on the degree of realism and amount of speed required for a particular rendering job.
See the OpenGL Programming Guide for a discussion of alpha blending.
In Inventor, the transparency quality level can be specified as follows:
| SCREEN_DOOR | ||
| ADD | use additive OpenGL alpha blending. | |
| DELAYED_ADD | use additive blending; render opaque objects first and transparent objects last. | |
| SORTED_OBJECT_ADD |
| |
| BLEND | use OpenGL alpha blending. (See Figure In-19.) | |
| DELAYED_BLEND |
| |
| SORTED_OBJECT_BLEND |
|
Transparency rendering with the ADD (or BLEND) level of transparency, however, works only if the transparent object is being blended into something already in the frame buffer. This type of transparency rendering computes the transparency in the order in which the objects are rendered.
To ensure that transparent objects are rendered last, use the DELAYED_ADD (or DELAYED_BLEND) level. For example, if you draw a transparent cube first and then draw an opaque cylinder behind the cone, you won't see the transparency with the ADD level of transparency. In this case, you must use DELAYED_ADD (or DELAYED_BLEND). The delayed levels require more time than ADD or BLEND, but the realism is greater. (Compare Figure In-19 and Figure In-20.)
For the highest degree of realism in rendering transparent objects, specify SORTED_OBJECT_ADD (or SORTED_OBJECT_BLEND). This level requires the most time but produces the best results. It renders the transparent objects after the opaque objects and also sorts the objects by distance from the camera, drawing them from back to front. (See Figure In-21.)
Note to OpenGL programmers: If you are using delayed or sorted transparency levels, Inventor does not update the z buffer for transparent objects so that they can be drawn in any order.
If you are using an SoXtRenderArea, you can use the setTransparency-
Type() method to set the quality level for rendering transparent objects.
The SoGLRenderAction class also provides methods for antialiasing, techniques used to eliminate or reduce jagged lines and make objects drawn on the screen appear smooth. You can choose from two antialiasing methods:
Smoothing, which is relatively “cheap” in terms of processing time. Smoothing applies to lines and points only.
Using the accumulation buffer, which requires more processing time than smoothing but applies to the whole image and results in superior antialiasing. This technique requires an OpenGL window that supports an accumulation buffer.
Use the SoGLRenderAction::setSmoothing() method to turn on smoothing. The isSmoothing() method returns the current state of the Smoothing flag. This form of antialiasing is for lines and points only. Because it requires alpha or additive blending, Inventor changes the transparency type if necessary when you turn on smoothing.
Normally, Inventor performs one rendering pass each time a render action is applied. You can use the SoGLRenderAction::setNumPasses() method to increase the number of rendering passes for accumulation buffer antialiasing. Inventor then renders the scene multiple times, moving the camera a little bit each time, and averages the results. The more times Inventor renders a scene, the better the antialiasing. The trade-off is that increasing the number of passes also increases the amount of time required to render the scene. The number of passes can be from 1 to 255, inclusive. Specifying 1 disables multipass antialiasing.
In addition, if you specify TRUE for the SoGLRenderAction::setPass-
Update() method, the current contents of the accumulation buffer are copied into the currently active drawing buffer after each rendering pass. This technique slows things down but allows you to watch what happens between the incremental rendering passes. The default for setPassUpdate() is FALSE.
To print all or part of an Inventor scene graph, use the SoOffscreen-Renderer class, which in turn uses an SoGLRenderAction to render an image into an off-screen memory buffer. This rendering buffer can be used both to generate an image to send to a PostScript printer (see Example 9-1) and to generate an image to be used as a texture map (see Example 9-2).
The image rendered into the buffer can be one of four component types:
| LUMINANCE | one component (grayscale) | |
| LUMINANCE_TRANSPARENCY |
| |
| RGB | three components (full color) | |
| RGB_TRANSPARENCY |
|
Use the SoOffscreenRenderer::setComponents() method to specify the components in the image generated before you render the image. To print black and white, use LUMINANCE. To print color, use RGB. To generate images with transparency information, use LUMINANCE_TRANSPARENCY or RGB_TRANSPARENCY.
 | Tip: If you want the output to go directly to a printer, use the SoXtPrintDialog, an Xt component. See the Open Inventor C++ Reference Manual for more information. |
To write a scene graph to a file in Encapsulated PostScript (EPS) format, you first render the scene with the off-screen renderer. Then you use the writeToPostScript() method to generate the PostScript output and write it to the given file.
For example, suppose you want to print a screen area that is 300 pixels by 400 pixels. Use the setWindowSize() method on SbViewportRegion to specify the size of the viewport to be printed:
SbViewportRegion vp; vp.setWindowSize(SbVec2s(300, 400)); rootNode = getMyScene(); SoOffscreenRenderer renderer(vp); renderer->render(rootNode); renderer->writeToPostScript(stdout); |
This code fragment assumes the default pixels per inch (approximately 72). To change the number of pixels per inch, use the setPixelsPerInch() method on SbViewportRegion. Typically, you use the resolution of the printer. For a 300 dots-per-inch (DPI) printer, you would specify the following:
vp.setPixelsPerInch(300); |
This resolution affects line width, the size of 2D text, and point size, which are all specified in pixels.
You may want the printed image to be the same size as the image rendered on the screen. To determine the size of the image on the screen, first use the getViewportSizePixels() method on SbViewportRegion to obtain the number of pixels (in x and y) of the viewport region. Then use the getScreenPixelsPerInch() method on SoOffscreenRenderer to find out the screen resolution in pixels.
screenVp = renderArea->getViewportRegion();
SbVec2s screenSize = screenVp.getViewportSizePixels();
float screenPixelsPerInch =
         SoOffscreenRenderer::getScreenPixelsPerInch();
|
Now you can calculate the size of the screen image in pixels by dividing x and y by screenPixelsPerInch. If you have a 300-by-400-pixel viewport on a screen with a resolution of 100 pixels per inch, your image is 3 by 4 inches.
To print this image at the same size, you specify the following:
vp.setWindowSize(SbVec2s(x_in_inches * printer_DPI, y_in_inches * printer_DPI)); vp.setPixelsPerInch(printer_DPI); |
Your OpenGL implementation may restrict the maximum viewport size. Use getMaximumResolution() to obtain the maximum resolution possible for a viewport in your window system.
Example 9-1 shows a simple function that renders a given scene graph and then saves it in a file that can be sent to a printer.
SbBool
printToPostScript (SoNode *root, FILE *file,
   SoXtExaminerViewer *viewer, int printerDPI)
{
   // Calculate size of the image in inches which is equal to
   // the size of the viewport in pixels divided by the number
   // of pixels per inch of the screen device.  This size in
   // inches will be the size of the Postscript image that will
   // be generated.
   const SbViewportRegion &vp  = viewer->getViewportRegion();
   const SbVec2s &imagePixSize = vp.getViewportSizePixels();
   SbVec2f imageInches;
   float pixPerInch;

   pixPerInch = SoOffscreenRenderer::getScreenPixelsPerInch();
   imageInches.setValue((float)imagePixSize[0] / pixPerInch,
                        (float)imagePixSize[1] / pixPerInch);

   // The resolution to render the scene for the printer
   // is equal to the size of the image in inches times
   // the printer DPI;
   SbVec2s postScriptRes;
   postScriptRes.setValue((short)(imageInches[0])*printerDPI,
                          (short)(imageInches[1])*printerDPI);

   // Create a viewport to render the scene into.
   SbViewportRegion myViewport;
   myViewport.setWindowSize(postScriptRes);
   myViewport.setPixelsPerInch((float)printerDPI);

   // Render the scene
   SoOffscreenRenderer *myRenderer =
            new SoOffscreenRenderer(myViewport);
   if (!myRenderer->render(root)) {
      delete myRenderer;
      return FALSE;
   }

   // Generate PostScript and write it to the given file
   myRenderer->writeToPostScript(file);

   delete myRenderer;
   return TRUE;
}
|
You can also use the off-screen renderer to render an image to be used as a texture map. In this case, use the SoOffscreenRenderer::render() method to render the image. Then use the getBuffer() method to obtain the buffer.
Example 9-2 shows the typical sequence for using the rendering buffer to generate a texture map.
#include <Inventor/SoDB.h>
#include <Inventor/SoInput.h>
#include <Inventor/Xt/SoXt.h>
#include <Inventor/Xt/viewers/SoXtExaminerViewer.h>
#include <Inventor/SbViewportRegion.h>
#include <Inventor/misc/SoOffscreenRenderer.h>
#include <Inventor/nodes/SoCube.h>
#include <Inventor/nodes/SoDirectionalLight.h>
#include <Inventor/nodes/SoPerspectiveCamera.h>
#include <Inventor/nodes/SoRotationXYZ.h>
#include <Inventor/nodes/SoSeparator.h>
#include <Inventor/nodes/SoTexture2.h>

SbBool
generateTextureMap (SoNode *root, SoTexture2 *texture,
   short textureWidth, short textureHeight)
{
   SbViewportRegion myViewport(textureWidth, textureHeight);

   // Render the scene
   SoOffscreenRenderer *myRenderer =
            new SoOffscreenRenderer(myViewport);
   myRenderer->setBackgroundColor(SbColor(0.3, 0.3, 0.3));
   if (!myRenderer->render(root)) {
      delete myRenderer;
      return FALSE;
   }
   // Generate the texture
   texture->image.setValue(SbVec2s(textureWidth, textureHeight),
            SoOffscreenRenderer::RGB, myRenderer->getBuffer());

   delete myRenderer;
   return TRUE;
}

main(int, char **argv)
{
   // Initialize Inventor and Xt
   Widget appWindow = SoXt::init(argv[0]);
   if (appWindow == NULL)
      exit(1);

   // Make a scene from reading in a file
   SoSeparator *texRoot = new SoSeparator;
   SoInput in;
   SoNode *result;

   texRoot->ref();
      in.openFile("jumpyMan.iv");
   SoDB::read(&in, result);

   SoPerspectiveCamera *myCamera = new SoPerspectiveCamera;
   SoRotationXYZ *rot = new SoRotationXYZ;
   rot->axis  = SoRotationXYZ::X;
   rot->angle = M_PI_2;
   myCamera->position.setValue(SbVec3f(-0.2, -0.2, 2.0));
   myCamera->scaleHeight(0.4);
   texRoot->addChild(myCamera);
   texRoot->addChild(new SoDirectionalLight);
   texRoot->addChild(rot);
   texRoot->addChild(result);

   // Generate the texture map
   SoTexture2 *texture = new SoTexture2;
   texture->ref();
   if (generateTextureMap(texRoot, texture, 64, 64))
      printf ("Successfully generated texture map\n");
   else
      printf ("Could not generate texture map\n");
   texRoot->unref();

   // Make a scene with a cube and apply the texture to it
   SoSeparator *root = new SoSeparator;
   root->ref();
   root->addChild(texture);
   root->addChild(new SoCube);

   // Initialize an Examiner Viewer
   SoXtExaminerViewer *viewer =
            new SoXtExaminerViewer(appWindow);
   viewer->setSceneGraph(root);
   viewer->setTitle("Offscreen Rendered Texture");
   viewer->show();

   SoXt::show(appWindow);
   SoXt::mainLoop();
}
|
Caching saves the result of an operation so that it doesn't need to be repeated. Inventor provides two kinds of caching: render caching and bounding-box caching. (See “Calculating a Bounding Box” for a description of the SoGetBoundingBoxAction.) For both the render action and the bounding-box action, you can specify that the results of the traversal be saved in a cache. The render cache, for example, contains an OpenGL display list that results from traversing the scene graph to be rendered. If the scene graph does not change, Inventor can use the contents of this cache for subsequent renderings, without traversing the scene graph at all.
An SoSeparator node has two fields that are used for caching. Possible values for these fields are AUTO, ON, or OFF. AUTO is the default value.
The SoSeparator class has a setNumRenderCaches() method that allows you to specify how many render caches each separator node will have. The greater the number of render caches that are built, the more memory used. You might use two caches, for example, if a viewer switches between wireframe and filled draw-styles, and the draw-style is set outside the cache. This method affects only the separator nodes that are created after it is called. Setting the number of render caches to 0 before any separators are created turns off render caching. The default number of render caches is 2.
The caching process begins with the separator group, as follows:
If a valid cache exists, the separator group ignores the scene graph below it and uses the contents of the cache.
If a valid cache does not exist, the separator group checks the appropriate field to see if it should create a cache.
If caching is ON, it opens a cache, traverses the nodes under the separator group, records the results in the cache, and then calls the cache. If caching is AUTO, Inventor uses a special set of conditions to determine whether it is efficient to create a cache.
The nodes under the separator group may inherit values from nodes that appear before the separator group in the graph. For example, materials, coordinates, texture coordinates, complexity nodes, normals, and bindings tend to be used by each shape. If these values change, the cache needs to change. (Note that if a texture outside the cache changes, the cache is still valid because the shape does not send the texture calls to OpenGL. The texture is sent directly to OpenGL when the SoTexture2 node is traversed.)
Be aware that these changes also invalidate the cache:
For SoText2, changing the font or camera (because the text is screen-aligned)
For SoText3, changing the profile coordinates or type of profile
Inventor is conservative in determining whether the current cache is valid (that is, caches may be invalidated and rebuilt even if inherited values have not changed).
Figure 9-3 shows a scene graph with a transform node whose values are changing frequently and a cube. In this case, turn on caching at the separator above the cube so that the changing transform values do not invalidate the cache.
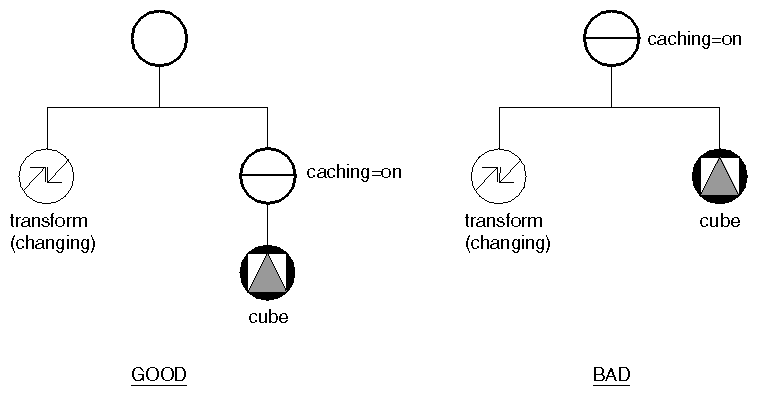
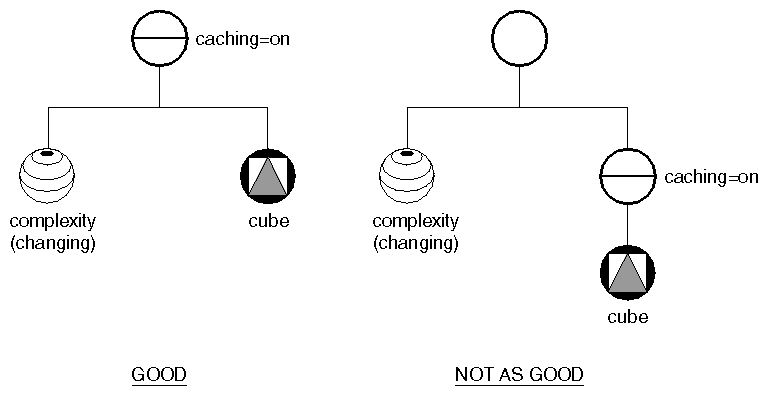
Figure 9-4 shows a scene graph with a complexity node whose values are changing frequently and a cube. Here, you would include both the property node and the shape in the same cache, since the shape always uses the property node when it is rendered.
Render caches can consume a great deal of memory, but they are very useful for speeding up rendering. Using the AUTO (default) value for render caching allows Inventor to determine whether creating a render cache will save time.
Bounding-box caching is relatively inexpensive. Inventor uses bounding-
box caching to speed up picking. If bounding-box caching is on and the user picks part of the graph that contains a separator group, the separator group can first check to see if the bounding box is picked. If not, it knows nothing under it is picked and does not need to traverse the subgraph.
If you are dealing with a large scene and you know that the camera will frequently view only part of that scene, you may want to turn on render culling so that Inventor doesn't take time rendering parts of the scene that lie completely outside the camera's view. An SoSeparator node has two flags used for culling: renderCulling and pickCulling. By default, render culling is AUTO. By default, pick culling is ON.
This description deals with render culling. (Pick culling works in a similar manner and is relatively inexpensive; you will probably simply leave it ON.) Here's a brief summary of how render culling works:
The camera puts the world-space view volume into the traversal state when it is traversed.
During traversal, the separator node tests its renderCulling field. If it is ON, it culls the render area, as follows:
It computes the bounding box for the separator, in object space. (This information may be cached already.)
It transforms the bounding-box information into world space and compares it to the view volume in the state.
If the bounding box is completely outside the current view volume, the separator does not traverse its children.
Since Step 2 (computing the bounding box and testing it) is fairly expensive in terms of time, render culling is off by default. You'll need to evaluate your scene graph to determine whether render culling will be efficient. For example, you could have a large scene graph with external walls, and detailed electrical and plumbing connections beneath them. Although the scene graph is complex, culling won't help because all elements would be in the camera's view at the same time. However, for scenes where objects are widely separated in space, such as a scene graph for a solar system, culling can be very useful.
| Tip: To facilitate culling, organize the database spatially so that objects that are close to each other in 3D space are under the same separator and objects far away from each other are under different separators. In the case of the scene graph with external walls, you could group the plumbing and electrical connections for each wall under a separator. |
Guidelines for turning on render culling are as follows:
In general, don't put a culling separator underneath a caching separator (that is, an SoSeparator with its renderCaching field set explicitly to ON). Use a culling separator under SoSeparator nodes with render caching set to OFF or AUTO.
The reason for this guideline is that culling depends on the camera. If a separator makes a culling decision, any cache that it is part of will depend on the camera. Caches dependent on the camera will often be broken, because in most applications, the camera changes frequently.
It's also efficient to turn on culling and caching at the same separator node (or turn on culling and leave caching at AUTO).
Turn on culling only for objects that are separated in space.
Turn on culling only for objects with a fairly large number of polygons, or deciding whether to cull might take longer than just drawing the object.
The bounding-box action computes a 3D bounding box that encloses the shapes in a subgraph under a node or defined by a path. This action also computes the center point of these shapes (see Example 9-3). SoGet-BoundingBoxAction is typically called on a path, which enables you to obtain a bounding box for a specific object in world coordinates. This action returns an SbBox3f, which specifies a 3D box aligned with the x-, y-, and z-axes in world coordinate space.
An example of creating an instance of SoGetBoundingBoxAction is
SbViewportRegion vpReg; vpReg.setWindowSize(300, 200); SoGetBoundingBoxAction bboxAction (vpReg); |
This constructor has one parameter, the viewport region. This information is needed for computing the bounding box of screen-aligned or screen-sized objects, such as SoText2.
SoGetBoundingBoxAction can be applied to the root node of a subgraph, to a path, or to a path list.
Three methods access the results of SoGetBoundingBoxAction:
| getBoundingBox() |
| |
| getCenter() | returns the computed center point for the shapes | |
| getXfBoundingBox() |
|
The center point returned by getCenter() is defined differently for different objects. For example, the center of an SoFaceSet is defined as the average of its vertices' coordinates. The center of a group is defined as the average of the centers of the objects in the group.
An SbXfBox3f stores the original bounding box for a shape and the matrix that transforms it to the correct world space. The advantage to using an SbXfBox3f instead of an SbBox3f is that the bounding box isn't enlarged unnecessarily. You may want to use this class if you need to perform additional transformations on the bounding box.
Example 9-3 shows using an SoGetBoundingBoxAction (bboxAction) to return the center of the graph rooted by a node so that rotations can be made around it.
SbViewportRegion myViewport; SoTransform *myTransform; SoGetBoundingBoxAction bboxAction(myViewport); bboxAction.apply(root); myTransform->center = bboxAction.getCenter(); |
The SoGetMatrixAction returns the current transformation matrix for any node derived from SoTransformation or for a path. When you apply this action to any SoTransformation node, it returns the transformation matrix for that node. When you apply it to a path, SoGetMatrixAction accumulates a transformation matrix for all the transformations in the subgraph defined by that path. This action enables you to convert from one coordinate space to another, typically from local space to world space (when you apply it to a path whose head node is the root of the scene graph).
An important distinction between SoGetMatrixAction and other actions is that SoGetMatrixAction does not traverse downward in the scene graph from the node or path to which it is applied. When applied to a node, it returns the current transformation matrix for that node only (and therefore makes sense only for transformation nodes, since all others return identity). When applied to a path, it collects transformation information for all nodes in the path but stops when it reaches the last node in the path chain.
The constructor for SoGetMatrixAction has no parameters:
SoGetMatrixAction mtxAction; |
Two methods return the results of SoGetMatrixAction:
The getInverse() method enables you to take a point in world space and map it into an object's local coordinate space. See the Open Inventor C++ Reference Manual for a description of the many convenient methods available for SbMatrix. For example, you can use multVecMatrix() to transform a point by a matrix. Use multDirMatrix() to transform a direction vector by a matrix. (Inventor assumes row vectors.)
| Tip: You can convert a point in one object's coordinate space into another object's space by applying a get-matrix action to the first object, transforming the point into world space using the matrix, applying a get-matrix action to the other object, and then transforming the world-space point by the inverse matrix of the second object. |
As an example, assume that SoGetMatrixAction is applied to the path shown in Figure 9-5. The xform1 node contains a translation of (0.0, 0.0, 1.0), and the xform2 node contains a scale of (0.5, 0.5, 0.5).
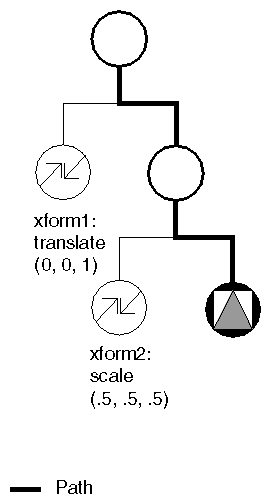
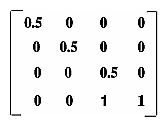
Each new transformation is premultiplied onto the current transformation matrix. In this case, the matrix multiplication looks like this:
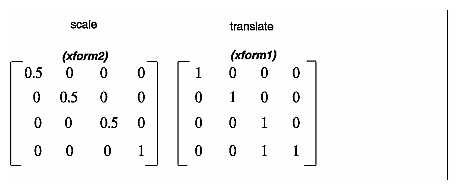
In this example, getMatrix() returns the following matrix:
For texture coordinates, use the getTextureMatrix() and getTextureInverse() methods. See Chapter 7 and the Open Inventor C++ Reference Manual for more information.
Inventor scene graphs can be written to a file in either ASCII or binary format. SoWriteAction is used for writing scene graphs to files. An instance of this class contains an instance of SoOutput, which by default writes to stdout in ASCII format. The getOutput() method returns a pointer to the SoOutput. Other methods for SoOutput include the following:
For example, to write in binary to an already open file pointed to by fp:
SoWriteAction myAction; FILE *fp; myAction.getOutput()->setBinary(TRUE); myAction.getOutput()->setFilePointer(fp); myAction.apply(root); |
To write in ASCII to a named file:
SoWriteAction myAction;

myAction.getOutput()->openFile("myFile.iv");
myAction.getOutput()->setBinary(FALSE);
myAction.apply(root);
myAction.getOutput()->closeFile();
|
See Chapter 11 for a complete description of the Inventor file format. Here is an example of the output of SoWriteAction for a subgraph:
#Inventor V2.0 ascii
Separator {
	   Separator {
       		Transform {
 			         scaleFactor 1 2 1
       		}
       		Material {
          			ambientColor .2 .2 .2
          			diffuseColor .6 .6 .6
          			specularColor .5 .5 .5
 			         shininess .5
       		}
       		Cube{
       }
    	}
}
|
SoSearchAction searches through the scene graph for paths to specific nodes, types of nodes, or nodes with a given name. First, you initialize the action. Then, you specify the node, node type, or name to search for (or a combination of these elements). If you specify a node type, you can also specify whether to search for an exact type match, or to search for subclasses of the specified type as well.
First, specify what you are searching for, whether you want to find all matches, and how to traverse the scene graph.
If you want to search for a particular node (by pointer), use the setNode() method. For example, you might use setNode() to search for a particular light-source node so that you can attach an editor to it.
Rather than searching for a specific node, you may want to search for a type of node (see Chapter 3). When searching for a node type, you then have the choice of searching for all nodes of a particular type, or for derivations of the given type (the default). The syntax for setType() is as follows:
Use the setName() method to specify the name of the node to search for. (See Chapter 3 for more information on naming.)
Use the setInterest() method to specify which paths to return:
| FIRST | returns only the first path found (the default) | |
| LAST | returns only the last path found | |
| ALL | returns all paths found |
To obtain the results of the search, use one of the following methods:
| getPath() | returns the found path (if interest is FIRST or LAST) | |
| getPaths() | returns the found path list (if interest is ALL) |
See the Open Inventor C++ Reference Manual for a complete description of all methods available for SoSearchAction.
The following example searches a scene graph for any node derived from SoLight. If it does not find one, it creates and adds an SoDirectionalLight. This example searches for only the first match by calling setInterest-
(SoSearchAction::FIRST).
SoSearchAction mySearchAction;

// Look for first existing light derived from class SoLight
mySearchAction.setType(SoLight::getClassTypeId());
mySearchAction.setInterest(SoSearchAction::FIRST);

mySearchAction.apply(root);
if (mySearchAction.getPath() == NULL) { // No lights found

   // Add a default directional light to the scene
   SoDirectionalLight *myLight = new SoDirectionalLight;
   root->insertChild(myLight, 0);
}
|
SoRayPickAction finds objects along a ray from the camera through a point on the near plane of the view volume. This ray is typically specified by giving the coordinates of a window-space pixel through which it passes. SoRayPickAction traverses the scene graph you apply the action to and then returns the paths to all shapes along the picking ray, sorted from nearest to farthest. The picking action is primarily interested in geometry, transformation, and shape nodes.
| Tip: The SoSelection node picks objects automatically. You don't need to explicitly use the pick action to select objects. The SoHandleEvent action also performs picking automatically. In addition, the SoEventCallback node allows you to register a callback function that is invoked whenever a certain event (such as a mouse press) occurs over a specified object. See Chapter 10 for more information on SoSelection, SoHandleEvent, and SoEventCallback. |
By default, all objects in the scene graph are pickable (even invisible and transparent objects). To make an object or group of objects invisible to the pick action, insert an SoPickStyle node in the scene graph and set its style field to UNPICKABLE. Anything that follows in the scene graph cannot be picked until the SoPickStyle node is reset to SHAPE (to pick points on the shape objects in the scene) or BOUNDING_BOX (to pick points on the bounding boxes for the objects in the scene). BOUNDING_BOX pick style is most often used for SoText3 nodes. The pick style, like all other properties, is saved and restored by SoSeparator groups.
The constructor for SoRayPickAction has one parameter, the viewport region (a required parameter).
An example of creating an instance of SoRayPickAction is
SbViewportRegion myViewport; SoRayPickAction myPickAction(myViewport); |
The viewport region is used to compute the bounding boxes for screen-aligned objects such as SoText2.
Before you apply the picking action, you can set the following parameters:
Ray to pick along
Whether to return all objects along the ray, or only the closest one
The picking ray can be specified in one of two ways: either specify a window point and a radius, or specify a point and a direction in world space. The first method is the more typical for interactive programs, since you are generally most interested in the area underneath the cursor.
Before you apply the picking action, use the setPoint() and setRadius() methods to set the ray to be used for picking.
The ray to pick along is typically specified in viewport coordinates, where
(0, 0) is the lower left corner of the viewport and (vpWidth-1, vpHeight-1) is the upper right corner (see Figure 9-6). In the figure, the viewport is 1000 by 1000. The near plane of the camera maps to the picking viewport.
To make it easier to pick lines and points, the ray can be augmented to be a cone (for a perspective camera; see Figure 9-6) or a cylinder (for an orthographic camera). Use the setRadius() method to control the size of this cone or cylinder where it intersects the near plane of the camera. (The default radius is 5 pixels.) Things that are picked must fall within this cone (or cylinder), as follows:
For points and lines, if any part of the shape falls within this cone, it is picked. (A sphere drawn with LINES draw-style is still picked as a solid sphere.)
For all other shapes, the ray itself must intersect the shape for it to be picked.

You can also specify the picking ray by specifying a world-space ray along which to pick. The ray is defined as a starting point, a direction vector, and a near distance and far distance for the picked objects. No radius is used. For example:
SbViewportRegion viewport(400, 300);
SbVec2s cursorPosition(250, 125);

SoRayPickAction myPickAction(viewport);

myPickAction.setRay(SbVec3f(0.0, 0.0, 0.0),  // starting point
                    SbVec3f(0.0, 0.0, -1.0); // direction vector
|
This example uses the default near and far distances, which disables clipping to the near and far planes.
The picking action can be applied to either a node, a path, or a path list. To apply the picking action to the root node of a scene graph:
pickAction->apply(rootNode); |
The results of the pick are stored in an SoPickedPoint (for the first hit) or an SoPickedPointList (for information on all hit objects). Use the methods on SoPickedPoint to obtain this information.
An SoPickedPoint represents a point on the surface of an object that was picked. The picked point contains the point of intersection, the surface normal and texture coordinates at that point, the index into the current set of materials, and the path to the object that was intersected. Use the following methods on SoPickedPoint to obtain this information:
For example:
SoPath *pathToPickedObject;

const SoPickedPoint *myPickedPoint =
         myPickAction.getPickedPoint();
if (myPickedPoint != NULL)
   pathToPickedObject = myPickedPoint->getPath();
|
Figure 9-7 shows the path returned by an SoRayPickAction (which can be obtained with the getPath() method on SoPickedPoint). This path contains a pointer to each node in the path to the picked object. Use the following methods on SoPickedPoint to obtain information about the pick in the object space of a particular node in the path chain. You pass in a pointer to the node you are interested in, or use the default (NULL) to obtain information about the tail of the path:
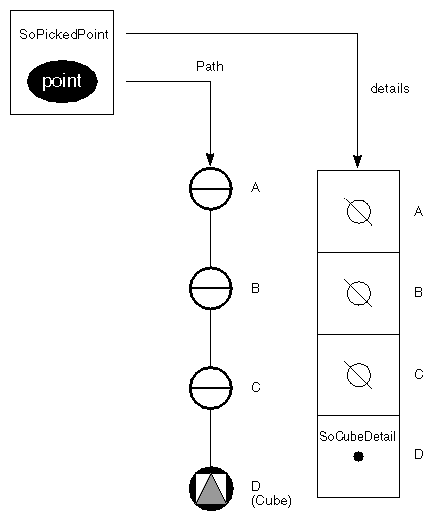
Each node in the picked path may have an associated SoDetail in which it can store additional information about the pick. For some classes, this associated SoDetail is NULL. Table 9-2 shows the classes that store information in a subclass of SoDetail.
Figure 9-8 shows the class tree for SoDetail.
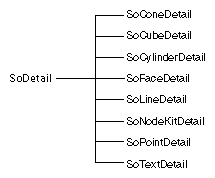
Table 9-2. Classes That Store an SoDetail
Class Name | Type of Detail Added | Information Provided |
|---|---|---|
SoCone | SoConeDetail | Contains information about which part of the cone was hit |
SoCube | SoCubeDetail | Contains information about which face (part) of the cube was hit |
SoCylinder | SoCylinderDetail | Contains information about which part of the cylinder was hit |
SoText2, SoText3 | SoTextDetail | Specifies the index of the string that was hit; the index of the character within the string that was hit; which part of the text was hit; the object-space bounding box of the character that was intersected |
SoFaceSet; all vertex-based shapes except lines, points, and NURBS | SoFaceDetail | Specifies which face in the shape was hit |
SoLineSet, SoIndexedLineSet | SoLineDetail | Specifies which line in the line set was hit |
SoPointSet | SoPointDetail | Specifies which point in the point set was hit |
Use the getDetail() method on SoPickedPoint to return the detail for a given node in the picked path. This method takes a pointer to a node in the picked path. It returns information for the tail of the path if NULL or no node is specified. For example, to determine whether a cylinder was hit and, if so, whether it was the top part of the cylinder, the code would be as follows:
const SoDetail *pickDetail = myPickedPoint->getDetail();
if (pickDetail != NULL && pickDetail->getTypeId() ==
                        SoCylinderDetail::getClassTypeId()) {
   // Picked object is a cylinder
   SoCylinderDetail *cylDetail =
            (SoCylinderDetail *) pickDetail;

   // See if top of the cylinder was hit
   if (cylDetail->getPart() == SoCylinder::TOP) {
      printf("Top of cylinder was hit\n");
   }
}
|
The following fragment shows how you could find the closest vertex to the hit point of a face-based shape using an SoFaceDetail. An SoFaceDetail contains an array of SoPointDetails. You can examine these details to find the coordinates of the point closest to the hit point by using the getCoordinateIndex() method on SoPointDetail. Finding the node that contains the coordinates is left to the application. (You can create a search action, apply it to the picked path, and ask for the last SoCoordinate3 node in the path. But you also need to know something about the structure of your graph—for example, whether it contains Override flags or Ignore flags that may affect the search.)
//   This function finds the closest vertex to an intersection
//   point on a shape made of faces, passed in the
//   "pickedPoint" argument. It returns the SoCoordinate3 node
//   containing the vertex's coordinates in the "coordNode"
//   argument and the index of the vertex in that node in the
//   "closestIndex" argument. If the shape is not made of faces
//   or there were any other problems, this returns FALSE.

static SbBool
findClosestVertex(const SoPickedPoint *pickedPoint,
            SoCoordinate3 *&coordNode, int &closestIndex)
{
   const SoDetail *pickDetail = pickedPoint->getDetail();

   if (pickDetail != NULL && pickDetail->getTypeId() ==
                             SoFaceDetail::getClassTypeId()) {
      // Picked object is made of faces
      SoFaceDetail *faceDetail = (SoFaceDetail *) pickDetail;

      // Find the coordinate node that is used for the faces.
      // Assume that it's the last SoCoordinate3 node traversed
      // before the picked shape.
      SoSearchAction  mySearchAction;
      mySearchAction.setType(SoCoordinate3::getClassTypeId());
      mySearchAction.setInterest(SoSearchAction::LAST);
      mySearchAction.apply(pickedPoint->getPath());

      if (mySearchAction.getPath() != NULL) {  // We found one
         coordNode = (SoCoordinate3 *)
                     mySearchAction.getPath()->getTail();

         // Get the intersection point in the object space
         // of the picked shape
         SbVec3f objIntersect = pickedPoint->getObjectPoint();

         // See which of the points of the face is the closest
         // to the intersection point
         float minDistance = 1e12;
         closestIndex = -1;
         for (int i = 0; i < faceDetail->getNumPoints(); i++) {
            int pointIndex =
                  faceDetail->getPoint(i)->getCoordinateIndex();
            float curDistance = (coordNode->point[pointIndex] -
                  objIntersect).length();
            if (curDistance < minDistance) {
               closestIndex = pointIndex;
               minDistance = curDistance;
            }
         }

         if (closestIndex >= 0)
            return TRUE;
      }
   }

   return FALSE;
}
|
Example 9-4 shows setting up the pick action and writing the path to the picked object to stdout.
SbBool
writePickedPath (SoNode *root,
   const SbViewportRegion &viewport,
   const SbVec2s &cursorPosition)
{
   SoRayPickAction myPickAction(viewport);

   // Set an 8-pixel wide region around the pixel
   myPickAction.setPoint(cursorPosition);
   myPickAction.setRadius(8.0);

   // Start a pick traversal
   myPickAction.apply(root);
   const SoPickedPoint *myPickedPoint =
            myPickAction.getPickedPoint();
   if (myPickedPoint == NULL)
      return FALSE;         // no object was picked

   // Write out the path to the picked object
   SoWriteAction myWriteAction;
   myWriteAction.apply(myPickedPoint->getPath());

   return TRUE;
}
|
The SoCallbackAction allows you to traverse the scene graph and accumulate state. It includes methods for calling back to application functions whenever nodes of a specified type are encountered during the traversal. At every node, the callback function has access to the entire Inventor traversal state. It can thus query any element in the state, such as the current coordinates, current normals, or current material binding. See the Open Inventor C++ Reference Manual on SoCallbackAction for a description of all state query functions.
The callback action also allows you to register callback functions that are called whenever certain shape nodes are traversed. The primitives used to draw the shape are passed to the callback function for use by the application.
This action provides a convenient mechanism for adding your own action to Inventor without subclassing (see The Inventor Toolmaker for information on creating a new action). It is particularly useful for C programmers who want to add functionality to scene graph traversal.
An example of creating an instance of SoCallbackAction is as follows:
SoCallbackAction cbAction; |
Inventor provides a number of methods for setting callback functions for a node. Each method takes a node type, a pointer to the user callback function, and a pointer to user data. The function is called whenever a node of the specified type or a subclass of that type, is encountered during traversal of the scene graph.
The following functions are set for any type of node:
In the case of a separator node, the addPreCallback() method is called before the children are traversed, and the addPostCallback() method is called after the children are traversed but before the state is restored. The addPreTailCallback() and addPostTailCallback() methods are used only when you apply the callback action to a path.
A general-purpose callback function must return one of three values:
| SoCallbackAction::CONTINUE |
| |
| SoCallbackAction::PRUNE |
| |
| SoCallbackAction::ABORT |
|
The following callback functions are set for a particular type of shape node. When these callback functions are set and the shape is traversed, primitives for the shape are generated, the callback function is invoked, and the primitives are passed to the callback function. You might use addTriangleCallback(), for example, if you are writing your own renderer and you want to tessellate all filled objects into triangles.
For triangles, the associated callback is of the following form:
void SoTriangleCB(void *userData, SoCallbackAction *action,
const SoPrimitiveVertex *v1,
const SoPrimitiveVertex *v2,
const SoPrimitiveVertex *v3);
Here, the callback function is called once for each triangle the shape generates. An example of using this callback function would be if you are writing a ray tracer and want to deal with only one type of data structure for all polygonal shapes. A triangle callback function can be registered on spheres, cones, cylinders, and NURBS surfaces, as well as on face sets and quad meshes.
An SoPrimitiveVertex is a vertex of a primitive shape (triangle, line segment, or point) that is generated by a callback action. It contains an object-space point, normal, texture coordinate, material index, and a pointer to an instance of an SoDetail subclass. The detail may contain additional information about the vertex.
| Tip: Your callback function can use the value of the draw-style element from the state if you want to determine if the triangles would be rendered as points or lines. For example: |
    if(SoDrawStyleElement::get(action->getState())==
    SoDrawStyleElement::LINES)
|
...//do something
See The Inventor Toolmaker for more information on elements.
Example 9-5 shows using the callback action to decompose a sphere into a set of triangle primitives.
...
SoSphere *mySphere = new SoSphere;
mySphere->ref();
printSpheres(mySphere);
...
void
printSpheres(SoNode *root)
{
   SoCallbackAction myAction;

   myAction.addPreCallback(SoSphere::getClassTypeId(),
            printHeaderCallback, NULL);
   myAction.addTriangleCallback(SoSphere::getClassTypeId(),
            printTriangleCallback, NULL);

   myAction.apply(root);
}

SoCallbackAction::Response
printHeaderCallback(void *, SoCallbackAction *,
      const SoNode *node)
{
   printf("\n Sphere ");
   // Print the node name (if it exists) and address
   if (! !node->getName())
      printf("named \"%s\" ", node->getName());
   printf("at address %#x\n", node);

   return SoCallbackAction::CONTINUE;
}

void
printTriangleCallback(void *, SoCallbackAction *,
   const SoPrimitiveVertex *vertex1,
   const SoPrimitiveVertex *vertex2,
   const SoPrimitiveVertex *vertex3)
{
   printf("Triangle:\n");
   printVertex(vertex1);
   printVertex(vertex2);
   printVertex(vertex3);
}

void
printVertex(const SoPrimitiveVertex *vertex)
{
   const SbVec3f &point = vertex->getPoint();
   printf("\tCoords     = (%g, %g, %g)\n",
               point[0], point[1], point[2]);

   const SbVec3f &normal = vertex->getNormal();
   printf("\tNormal     = (%g, %g, %g)\n",
               normal[0], normal[1], normal[2]);
}
|