Chapter Objectives
After reading this chapter, you'll be able to do the following:
Use node kits in a scene graph, selecting the required parts and setting their values
Explain the difference between a path, a full path, and a node-kit path
Create a simple motion hierarchy using node kits
This chapter describes node kits, which are a convenient mechanism for creating groupings of Inventor nodes. When you create a shape node such as an indexed triangle strip set, you usually also need at least a coordinate node, a material node, and a transform node. You may also want to specify drawing style and a material binding. Instead of creating each of these nodes individually, specifying values for their fields, and then arranging them into a subgraph, you can simply use an SoShapeKit, which already contains information on how these nodes should be arranged in the subgraph. You then use a special set of convenience methods to specify which nodes you want to use and to set and get the values of these nodes. This chapter introduces the concepts of node kits, node-kit catalogs, catalog entries, and hidden children.
Node kits offer a convenient way to create both simple and complex graphs of nodes. Node kits can contain other node kits, a feature that allows you to build hierarchies of kits relative to each other. Some of the advantages of node kits include the following:
Node kits organize a number of Inventor nodes into a subgraph that has a higher-level meaning for you. An SoShapeKit, for example, can describe a shape that can move and has a particular appearance. The shape and its properties are all packaged into one node kit. You do not need to worry about how the nodes are placed into the graph because the node kit takes care of this organization for you.
Node kits are flexible, allowing you to create complex subgraphs that use many Inventor features, or simple subgraphs that use only a few features.
Node kits create collections of nodes efficiently. They create only the nodes needed for a particular instance.
Node kits provide shortcut routines for creating nodes and setting values in them. Your code is short and easy to read.
Through subclassing, you can design your own node kits that are tailored to the kinds of groupings used in your particular application. (See The Inventor Toolmaker, Chapter 7.)
A node kit contains a collection of nodes. The node kit manages these nodes and how they are arranged in its subgraph. You can create and remove these nodes, or parts, of the node kit. But, because the node kit is actually managing these parts, you do not have direct access to them. These parts are referred to as the hidden children of the node kit. Although a node kit is a grouping of nodes, it is not subclassed from SoGroup; methods such as addChild() do not exist for node kits.
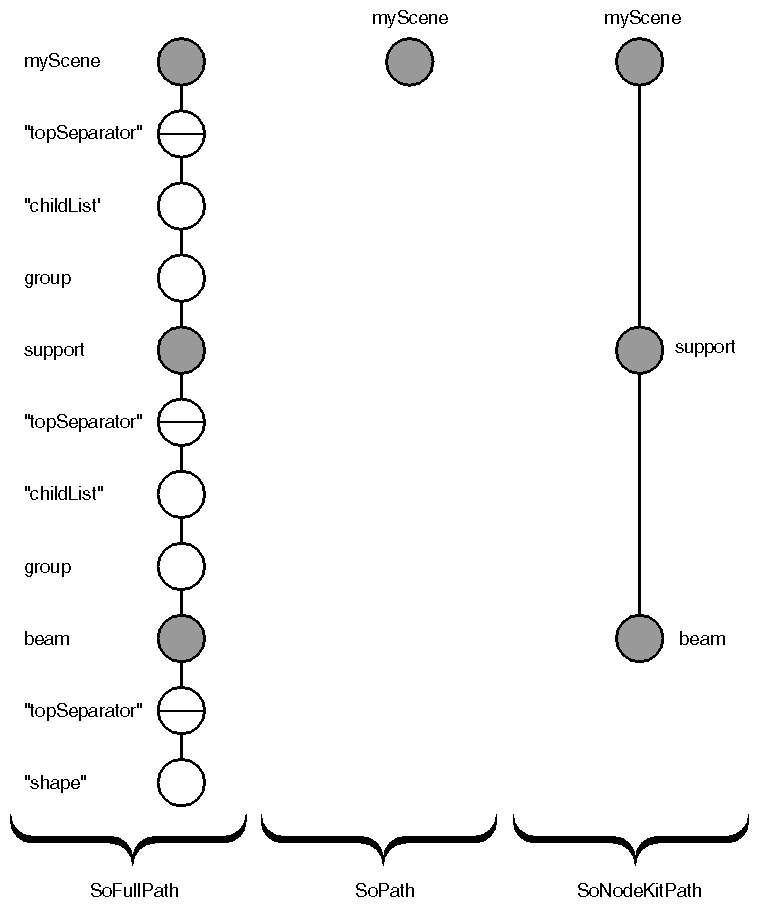
Whenever you perform a pick or a search action, a path may be returned. The default path returned, SoPath, stops at the first node in the path that has hidden children (often a node kit). If you need more detailed information about what is in the path underneath the node kit, you can cast the SoPath to an SoFullPath, which includes hidden children as well as public children. If, for example, you search for spheres in a given scene graph, you may get a path to a node kit with hidden children, one of which is a sphere. The SoPath returned by the search action ends in the node kit. In most cases, you can probably ignore the hidden children. But if you need information about them, you can cast this path to an SoFullPath.
You will probably use node kit paths more often than you use full paths. If you use full paths with node kits, take care not to change the node kit's structure.
 | Tip: When you cast a path (not a pointer) to a full path, be sure to cast a pointer; otherwise a new instance of the path is created. For example, you can do this: |
SoPath &pathRef; ((SoFullPath *) &pathRef)->getLength(); But don't do this: length = ((SoFullPath) pathRef).getLength(); |
Another kind of path is the SoNodeKitPath, which contains only the node kits and leaves out the intermediate nodes in the path. You might use a node-kit path if you are looking at a motion hierarchy (see Example 14-3) and you want to think of each kit as an object. Figure 14-1 shows a path, a full path, and a node-kit path for the same subgraph. The shaded circles are node kits, and the light circles are not.
Figure 14-2 shows the class tree for node kits, which are all derived from SoBaseKit.
See the entry for SoBaseKit in the Open Inventor C++ Reference Manual for a complete list of the methods for getting and setting parts in node kits.
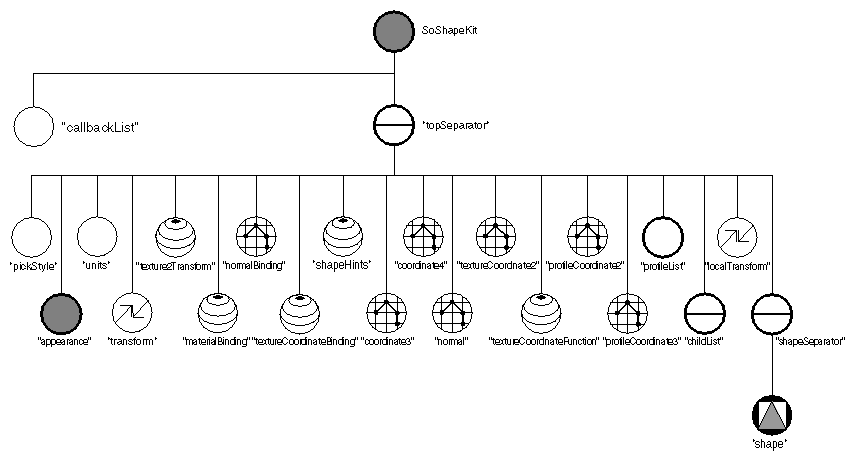
Each node-kit class shown in Figure 14-2 has an associated catalog. The catalog lists all the parts (nodes) available in this kit, in the same way as an electronics or software catalog lists all the items available for sale. Just as you order items selectively from a software catalog, you can choose nodes selectively from a node-kit catalog. In addition to simply listing the available parts, a node-kit catalog also describes how the nodes are arranged into a subgraph when you select them.
For example, the catalog for an SoShapeKit is shown in Figure 14-3.
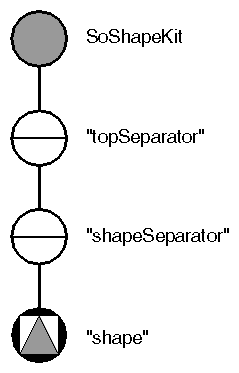
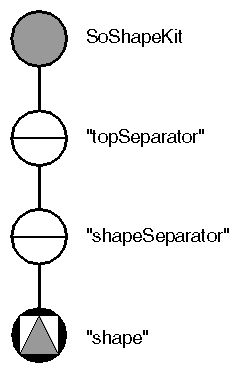
When you first create an SoShapeKit, you get the “base model,” shown in Figure 14-4. By default, the “shape” part is a cube. You can change this shape and also add options as you need them.
A node-kit catalog contains a separate entry to describe each part. The SoShapeKit catalog shown in Figure 14-3 has 24 entries. Each catalog entry contains the following pieces of information:
Name of the part
Type of node
Default type (used if Type is an abstract class)
Whether this part is created by default
Name of this part's parent
Name of the right sibling of this part
Whether this part is a list
If the part is a list, the type of group node that is used to contain the list items
If the part is a list, the permissible node types for entries in this list
Whether this part is public
The following list shows several sample catalog entries from SoShapeKit.
Information | Sample Entry 1 | Sample Entry 2 |
|---|---|---|
Name | “callbackList” | “transform” |
Type | SoNodeKitListPart | SoTransform |
Default Type | (Not Applicable) | (Not Applicable) |
Created by Default? | FALSE | FALSE |
Parent Name | “this” | “topSeparator” |
Right Sibling | “topSeparator” | “texture2Transform” |
Is It a List? | TRUE | FALSE |
List Container Type | SoSeparator | (Not Applicable) |
List Element Type | SoCallback | (Not Applicable) |
| SoEventCallback |
|
Is It Public? | TRUE | TRUE |
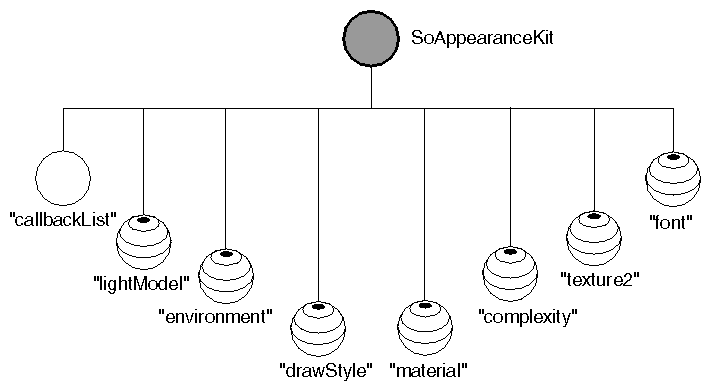
An SoShapeKit contains another node kit, “appearance,” which is an SoAppearanceKit. The catalog for SoAppearanceKit is shown in
Figure 14-5.
The following constructor creates an instance of an SoShapeKit:
SoShapeKit *myShapeKit = new SoShapeKit(); |
When an instance of a node kit is created, certain nodes are created by default. In the kits provided, the SoShapeKit, SoLightKit, and SoCameraKit create the parts “shape,” “light,” and “camera,” respectively. The default types for these parts are SoCube, SoDirectionalLight, and SoPerspectiveCamera.
When the shape kit is constructed, it automatically creates the cube node as well as the top separator and shape separator nodes for the group. (Internal nodes, such as the separator node, are automatically created when you add a node lower in the node kit structure.) At this point, the scene graph would look like Figure 14-4. The shape kit now consists of four nodes: the SoShapeKit node itself, the top separator node, the shape separator (used for caching even when the transform or material is changing) and the cube node. The other nodes in the shape-kit catalog are not created until you explicitly request them, as described below.
Next you can use the set() method, a method for SoBaseKit that is inherited by all node kits. Use the set() method to create a part and specify field values in the new node. This method has two different forms:
set(nameValuePairListString); // uses braces to separate
// part names from value pairs
or
set(partNameString, parameterString); // does not use braces
An example of the first form of set(), which makes a material node and
sets the diffuse color field to purple is as follows:
myShape->set("material { diffuseColor 1 0 1 }");
|
An example of the second form of set(), which does the same thing, is as follows:
myShape->set("material", "diffuseColor 1 0 1");
|
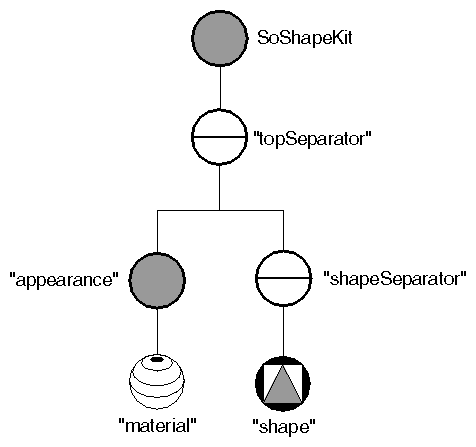
The scene graph for this instance of the shape kit now looks like Figure 14-7. Note that the SoAppearanceKit node is created automatically when you request the material node. Also note that the node is created only if it does not yet exist. Subsequent calls to set() edit the fields of the material node rather than recreate it.
Now suppose you want to make the cube wireframe rather than solid, and twice its original size:
myShape->set("drawStyle { style LINES }
             transform { scaleFactor 2.0 2.0 2.0 } ");
|
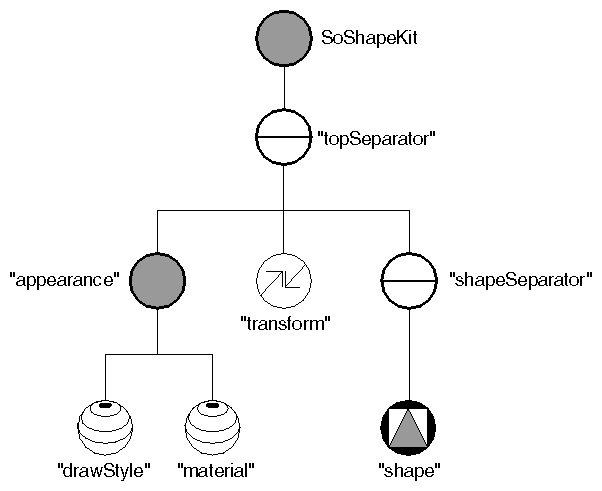
The scene graph now looks like Figure 14-8.
Note that you can use the set() method to create the nodes in any order. The node kit automatically inserts the nodes in their correct positions in the scene graph, as specified by the node-kit catalog.
This instance of the shape kit now contains eight nodes, as shown in Figure 14-8.
Two other useful methods of SoBaseKit() are getPart() and setPart().
The getPart() method returns the requested node (part):
getPart(partName, makeIfNeeded);
If makeIfNeeded is TRUE and no node is present, the node is created. In addition, if any extra nodes are needed to connect the node to the top node (“this”) of the node kit, those nodes are created as well.
For example:
xf = (SoTransform *) myKit->getPart("transform", TRUE);
|
looks for “transform” and either returns it (if found) or makes it (if not found). It then assigns this node to xf. If you specify FALSE for makeIfNeeded and the node kit has no “transform” yet, the method returns NULL without creating the node. If the catalog for the type of node kit you are using does not have an entry for a part named “transform,” the getPart() method returns NULL.
The setPart() method inserts the given node as a new part in the
node kit:
setPart(partName, node);
If extra nodes are required to connect the part into the node-kit structure, those nodes are created as well. For example, suppose you want another node kit to share the transform node (xf) created in the previous example:
myOtherKit->setPart("transform", xf);
|
If the given node is not derived from the type of that part, as described in the node-kit catalog, the part will not be set. If you have linked with the debugging library, an error message will print.
To delete the transform node entirely, use a NULL argument for the node pointer:
myOtherKit->setPart("transform", NULL);
|
To change the “shape” in SoShapeKit from the default cube to a cone:
myShape->setPart("shape", new SoCone);
|
And, of course, setPart() will do nothing if there is no part with the specified name in the catalog.
Instead of using the getPart() method, you can use the macros SO_GET_PART() and SO_CHECK_PART(). If you compile with the debugging version of the Inventor library, these macros perform casting and type check the result for you. (If you link with the optimized version of Inventor, no type-checking is performed.)
The syntax for SO_GET_PART() is as follows:
SO_GET_PART(kitContainingPart, partName, partClassName);
This macro does the type-casting for you and is equivalent to
(partClassName *) kitContainingPart->getPart(partName, TRUE);
Since the makeIfNeeded argument is TRUE in this macro, the part is created if it is not already in the node kit.
For example:
xf = SO_GET_PART(myKit, "transform", SoTransform); |
The syntax for SO_CHECK_PART() is as follows:
SO_CHECK_PART(kitContainingPart, partName, partClassName);
This macro does the type-casting for you and is equivalent to
(partClassName *) kitContainingPart->getPart(partName, FALSE);
Since the makeIfNeeded argument is FALSE in this macro, the part is not created if it is not already in the node kit.
For example:
xf = SO_CHECK_PART(myKit, "transform", SoTransform);
if (xf == NULL)
   printf("Transform does not exist in myKit.");
else
   printf("Got it!");
|
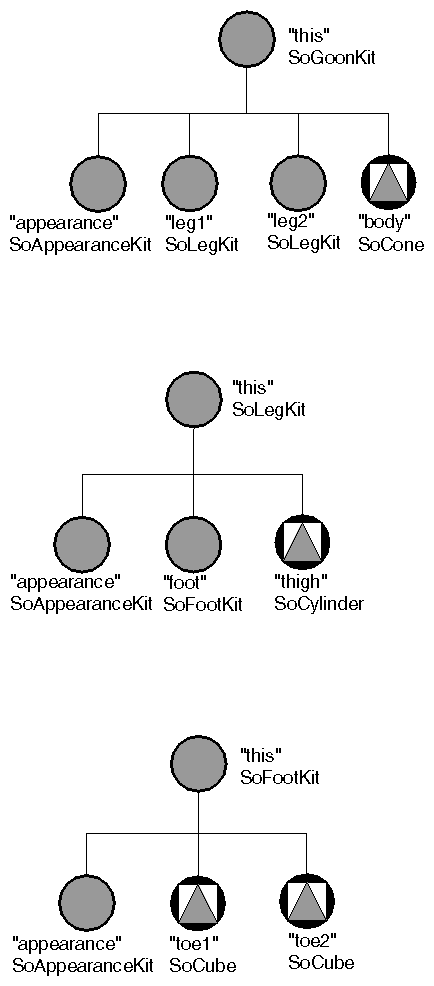
Suppose you have created the three node-kit classes shown in Figure 14-9 (see The Inventor Toolmaker, Chapter 7, for information on how to subclass node kits):
An SoGoonKit, which defines the complete creature, a goon. This goon consists of an SoAppearanceKit, two instances of SoLegKit for leg1 and leg2, and an SoCone for body.
An SoLegKit, which defines a leg for a goon. This class contains an SoAppearanceKit, an SoFootKit, and an SoCylinder for thigh.
An SoFootKit, which defines a foot for a goon. This class contains an SoAppearanceKit, an SoCube for toe1, and an SoCube for toe2.
After creating an instance of SoGoonKit (myGoon), you can be very specific when asking for the parts. For example:
myCube = SO_GET_PART(myGoon, "toe1", SoCube); |
first looks in the catalog of myGoon for toe1. If it doesn't find toe1 and some children in the catalog are node kits, it looks inside the leaf node kits for toe1 and uses the first match it finds. Here, the match would be found in the foot of leg1. But what if you really want toe1 in leg2? In that case, you may specify:
myCube = SO_GET_PART(myGoon, "leg2.toe1", SoCube); |
which returns toe1 in leg2. This is equivalent to leg2.foot.toe1.
You can also refer to parts by indexing into any part that is defined as a list in the catalog—for example, “childList[0]” or “callbackList[2].”
The following excerpts illustrate three different ways to create node-kit parts and set their values. These excerpts assume you have subclassed to create your own class, derived from SoBaseKit, an SoGoonKit (see The Inventor Toolmaker, Chapter 7). This goon has a body, legs, and feet, as described earlier.
This fragment shows setting each part individually:
SoGoonKit *myGoon = new SoGoonKit();
myGoon->set("body.material", "diffuseColor [1 0 0 ]");
				// makes body red
myGoon->set("leg2.toe1", "width 2 height 3 depth 1");
				// creates toe with proper dimensions
|
This fragment shows getting parts and editing them:
SoGoonKit *myGoon = new SoGoonKit(); SoMaterial *bodyMtl; SoCube *toe; bodyMtl = SO_GET_PART(myGoon, "body.material", SoMaterial); bodyMtl->diffuseColor.setValue(1, 0, 0); toe = SO_GET_PART(myGoon, "leg2.toe1", SoCube); toe->width.setValue(2); toe->height.setValue(3); toe->depth.setValue(1); |
This fragment shows setting both parts in one command:
SoGoonKit *myGoon = new SoGoonKit();
myGoon->set(				"body.material { diffuseColor [ 1 0 0 ] }
				             leg2.toe1     { width 2
				                             height 3
				                             depth 1 }");
|
Sometimes you will need a path down to one of the node kit parts—for instance, to replace a part with a manipulator as described in Chapter 15. Use the createPathToPart() method to obtain the path to the desired node for the manipulator.
createPathToPart(partName, makeIfNeeded, pathToExtend);
|
For example, after picking a node kit, replace the transform part with a trackball manipulator:
SoPath *pickPath = myPickAction->getPath();

if((pickPath != NULL) &&
(pickPath->getTail()->isOfType(SoBaseKit::getClassTypeId())){
SoTrackballManip *tb = new SoTrackball;
SoBaseKit *kit = (SoBaseKit *) pickPath->getTail();
   // extends the pick path all the way down
		   // to the transform node
SoPath *attachPath = kit->createPathToPart("transform",
					                     TRUE, pickPath);
		tb->replaceNode(attachPath);
|
Note that using replaceNode() does more work for you than simply calling
setPart("transform", tb)
|
Field values are copied from the existing “transform” part into the trackball manipulator's fields.
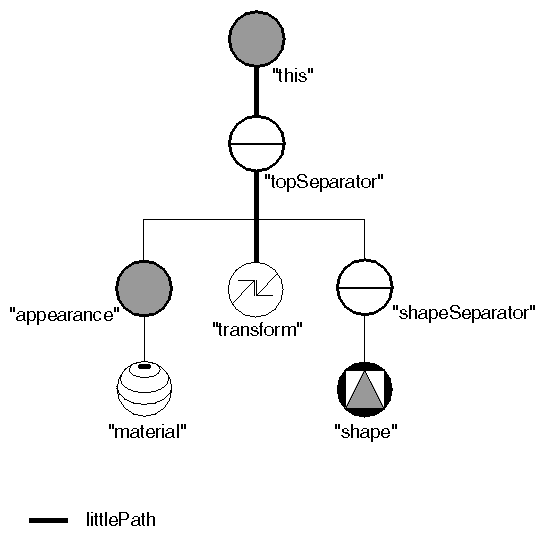
If the pathToExtend parameter is NULL or missing, createPathToPart() simply returns the path from the top of the node kit to the specified part (see Figure 14-10):
SoPath *littlePath;
littlePath = myKit->createPathToPart("transform", TRUE);
|
Since makeIfNeeded is TRUE, the “transform” part will be created if it does not already exist. However, if makeIfNeeded is FALSE and the part does not exist, createPathToPart returns NULL.
 | Tip: If you want to view the full path, including hidden children, be sure to cast the SoPath to an SoFullPath. |
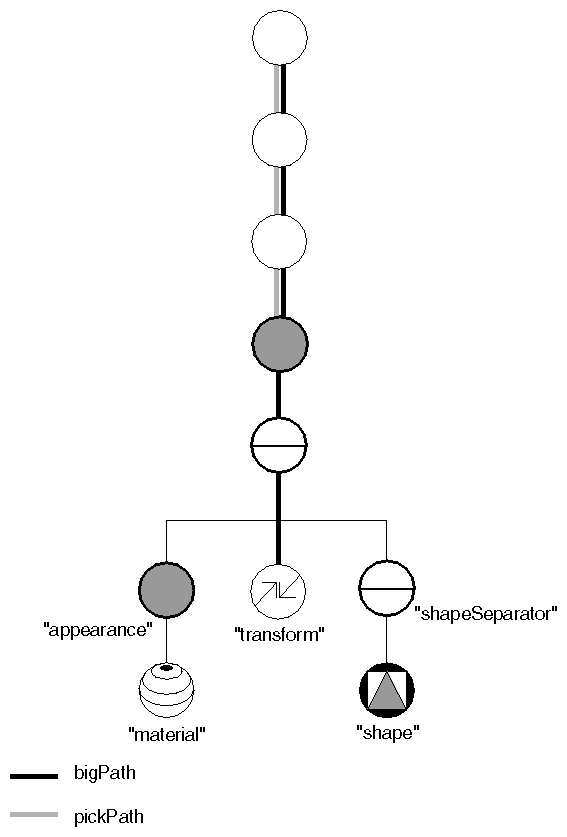
If the pathToExtend parameter is used, createPathToPart() extends the path provided all the way down to the specified part within the node kit (here, the “transform” node). (See Figure 14-11.) If the path provided as input (in this case, pickPath) does not include the specified node kit, bigPath equals NULL. If the path given as input extends past the specified node kit, the path will first be truncated at the node kit before extending it to reach the part.
bigPath = myKit->createPathToPart("transform", TRUE, pickPath);
|
To create a path to a child within a list part, use the same indexing notation as you would for setPart() or getPart():
pathToListElement = createPathToPart("callbackList[0]", TRUE);
|
Some node-kit parts are actually lists of parts. These lists, of type SoNodeKitListPart, are a special type of group that restricts its children to certain classes of nodes. Examples are “childList” (found in SoSeparatorKit and SoSceneKit) and “cameraList” and “lightList” (both found in SoSceneKit). Whenever you add a child to a node-kit list, the group checks to see if that child is legitimate. If the child is not legitimate, it is not added (and if you are using the debugging library, an error is printed).
Use getPart() to obtain the requested list, then use any of the standard group methods for adding, removing, replacing, and inserting children in the parts list. (But remember that each of these methods is redefined to check the types of children before adding them.) For example:
SoPointLight *myLight = new SoPointLight;
ls = (SoNodeKitListPart *) k->getPart("lightList", TRUE);

ls->addChild(myLight);
|
SoSeparatorKit is a class of node kit. All classes derived from separator kit inherit a part called “childList,” of type SoNodeKitListPart. Through use of the “childList,” separator kits allow you to think in terms of how parts of an object move relative to each other. Each element of the child list is, in turn, an SoSeparatorKit and may contain its own transform node. By nesting separator kits, multiple levels of relative motion can be achieved.
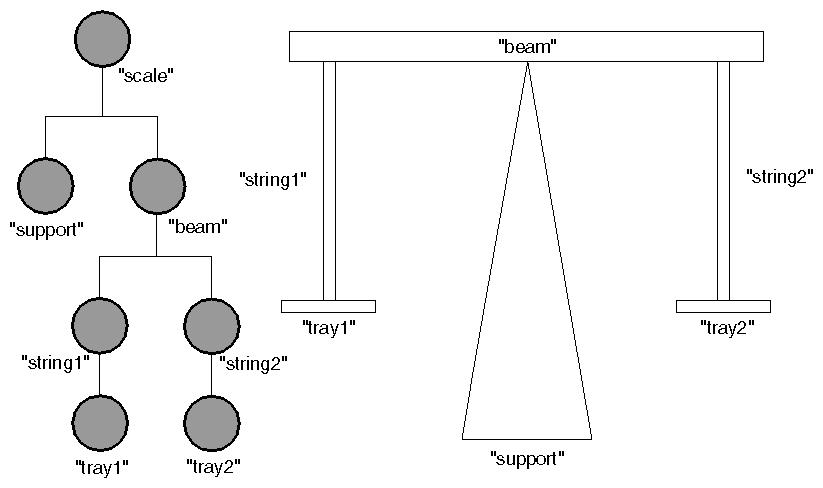
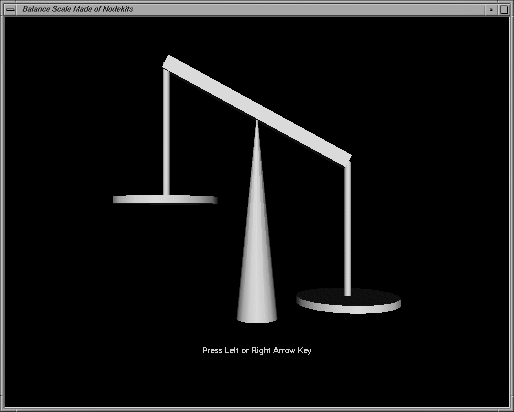
Figure 14-12 shows how you might group individual parts that move together. Assume you have already made an individual SoSeparatorKit for each part in a balance scale, shown in Figure 14-12. You want tray1 and string1 to move as a unit, and tray2 and string2 to move as a unit. But when the beam moves, both trays and both strings move with it.
As you arrange these group kits into a hierarchy, you don't need to think in terms of the individual parts each group kit contains (“material,” “complexity,” and so on). You can think of the objects themselves (beam, strings, trays) and how they move relative to each other. The childList for SoSeparatorKit can contain any node derived from SoSeparatorKit, so any type of separator kit is permissible as an entry in this list.
The following code constructs the hierarchy shown in Figure 14-12. A working version of this model is provided in Example 14-3 at the end of this chapter.
scale->setPart("childList[0]", support);
scale->setPart("childList[1]", beam);
beam->setPart("childList[0]", string1);
beam->setPart("childList[1]", string2);
string1->setPart("childList[0]", tray1);
string2->setPart("childList[0]", tray2);
|
This section includes three examples of node kits. The first example uses two SoShapeKits. The second example, with detailed comments, uses an SoWrapperKit and an SoSceneKit that contains an SoLightKit and an SoCameraKit. The third example uses various node kits as well as an SoEventCallback with an associated function for animating the balance scale.
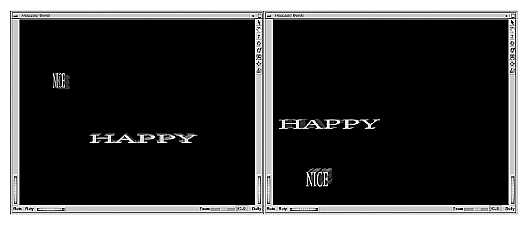
Example 14-1 uses node kits to create two 3D words and shows use of node kit methods to access the fields of the “material” and “transform” parts of the shape kits. It uses a calculator engine and an elapsed time engine to make the words change color and fly around the screen. Figure 14-13 shows two images from this example.
#include <Inventor/engines/SoCalculator.h>
#include <Inventor/engines/SoElapsedTime.h>
#include <Inventor/nodekits/SoShapeKit.h>
#include <Inventor/nodes/SoMaterial.h>
#include <Inventor/nodes/SoSeparator.h>
#include <Inventor/nodes/SoText3.h>
#include <Inventor/nodes/SoTransform.h>

#include <Inventor/Xt/SoXt.h>
#include <Inventor/Xt/viewers/SoXtExaminerViewer.h>

main(int , char **argv)
{
   Widget myWindow = SoXt::init(argv[0]);
   if (myWindow == NULL) exit(1);

   SoSeparator *root = new SoSeparator;
   root->ref();

   // Create shape kits with the words "HAPPY" and "NICE"
   SoShapeKit *happyKit = new SoShapeKit;
   root->addChild(happyKit);
   happyKit->setPart("shape", new SoText3);
   happyKit->set("shape { parts ALL string \"HAPPY\"}");
   happyKit->set("font { size 2}");

   SoShapeKit *niceKit = new SoShapeKit;
   root->addChild(niceKit);
   niceKit->setPart("shape", new SoText3);
   niceKit->set("shape { parts ALL string \"NICE\"}");
   niceKit->set("font { size 2}");

   // Create the Elapsed Time engine
   SoElapsedTime *myTimer = new SoElapsedTime;
   myTimer->ref();
|
   // Create two calculators - one for HAPPY, one for NICE.
   SoCalculator *happyCalc = new SoCalculator;
   happyCalc->ref();
   happyCalc->a.connectFrom(&myTimer->timeOut);
   happyCalc->expression = "ta=cos(2*a); tb=sin(2*a);\
      oA = vec3f(3*pow(ta,3),3*pow(tb,3),1);         \
      oB = vec3f(fabs(ta)+.1,fabs(.5*fabs(tb))+.1,1);\
      oC = vec3f(fabs(ta),fabs(tb),.5)";

   // The second calculator uses different arguments to
   // sin() and cos(), so it moves out of phase.
   SoCalculator *niceCalc = new SoCalculator;
   niceCalc->ref();
   niceCalc->a.connectFrom(&myTimer->timeOut);
   niceCalc->expression = "ta=cos(2*a+2); tb=sin(2*a+2);\
      oA = vec3f(3*pow(ta,3),3*pow(tb,3),1);            \
      oB = vec3f(fabs(ta)+.1,fabs(.5*fabs(tb))+.1,1);   \
      oC = vec3f(fabs(ta),fabs(tb),.5)";

   // Connect the transforms from the calculators...
   SoTransform *happyXf
      = (SoTransform *) happyKit->getPart("transform",TRUE);
   happyXf->translation.connectFrom(&happyCalc->oA);
   happyXf->scaleFactor.connectFrom(&happyCalc->oB);
   SoTransform *niceXf
      = (SoTransform *) niceKit->getPart("transform",TRUE);
   niceXf->translation.connectFrom(&niceCalc->oA);
   niceXf->scaleFactor.connectFrom(&niceCalc->oB);

   // Connect the materials from the calculators...
   SoMaterial *happyMtl
      = (SoMaterial *) happyKit->getPart("material",TRUE);
   happyMtl->diffuseColor.connectFrom(&happyCalc->oC);
   SoMaterial *niceMtl
      = (SoMaterial *) niceKit->getPart("material",TRUE);
   niceMtl->diffuseColor.connectFrom(&niceCalc->oC);

   SoXtExaminerViewer *myViewer = new
            SoXtExaminerViewer(myWindow);
   myViewer->setSceneGraph(root);
   myViewer->setTitle("Frolicking Words");
   myViewer->viewAll();
   myViewer->show();

   SoXt::show(myWindow);
   SoXt::mainLoop();
}
|
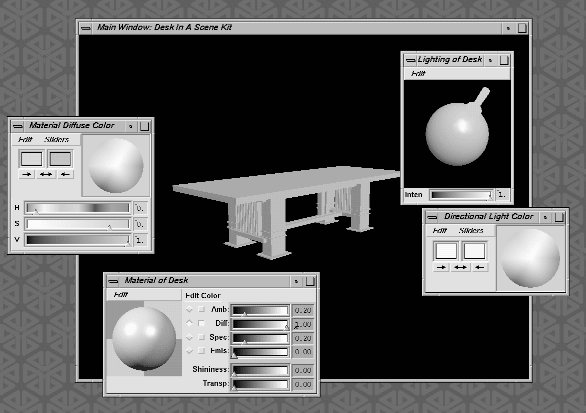
Example 14-2 reads in a desk from a file and puts it in the “contents” part of an SoWrapperKit. It adds a directional light editor to the light in the scene and a material editor to the desk, as shown in Figure 14-14. The scene is organized using an SoSceneKit, which contains lists for grouping lights (“lightList”), cameras (“cameraList”), and objects (“childList”) in a scene.
#include <Inventor/SoDB.h> #include <Inventor/SoInput.h> #include <Inventor/nodekits/SoCameraKit.h> #include <Inventor/nodekits/SoLightKit.h> #include <Inventor/nodekits/SoSceneKit.h> #include <Inventor/nodekits/SoWrapperKit.h> #include <Inventor/nodes/SoMaterial.h> #include <Inventor/nodes/SoPerspectiveCamera.h> #include <Inventor/nodes/SoSeparator.h> #include <Inventor/Xt/SoXt.h> #include <Inventor/Xt/SoXtDirectionalLightEditor.h> #include <Inventor/Xt/SoXtMaterialEditor.h> #include <Inventor/Xt/SoXtRenderArea.h> |
main(int , char **argv)
{
   // Initialize Inventor and Xt
   Widget myWindow = SoXt::init(argv[0]);
   if (myWindow == NULL) exit(1);

   // SCENE!
   SoSceneKit *myScene = new SoSceneKit;
   myScene->ref();

   // LIGHTS! Add an SoLightKit to the "lightList." The
   // SoLightKit creates an SoDirectionalLight by default.
   myScene->setPart("lightList[0]", new SoLightKit);

   // CAMERA!! Add an SoCameraKit to the "cameraList." The
   // SoCameraKit creates an SoPerspectiveCamera by default.
   myScene->setPart("cameraList[0]", new SoCameraKit);
   myScene->setCameraNumber(0);

   // Read an object from file.
   SoInput myInput;
   if (!myInput.openFile("desk.iv"))
      return (1);
   SoSeparator *fileContents = SoDB::readAll(&myInput);
   if (fileContents == NULL) return (1);
   // OBJECT!! Create an SoWrapperKit and set its contents to
   // be what you read from file.
   SoWrapperKit *myDesk = new SoWrapperKit();
   myDesk->setPart("contents", fileContents);
   myScene->setPart("childList[0]", myDesk);
   // Give the desk a good starting color
   myDesk->set("material { diffuseColor .8 .3 .1 }");

   // MATERIAL EDITOR!!  Attach it to myDesk's material node.
   // Use the SO_GET_PART macro to get this part from myDesk.
   SoXtMaterialEditor *mtlEditor = new SoXtMaterialEditor();
   SoMaterial *mtl = SO_GET_PART(myDesk,"material",SoMaterial);
   mtlEditor->attach(mtl);
   mtlEditor->setTitle("Material of Desk");
   mtlEditor->show();

   // DIRECTIONAL LIGHT EDITOR!! Attach it to the
   // SoDirectionalLight node within the SoLightKit we made.
   SoXtDirectionalLightEditor *ltEditor =
                 new SoXtDirectionalLightEditor();
   SoPath *ltPath = myScene->createPathToPart(
      "lightList[0].light", TRUE);
   ltEditor->attach(ltPath);
   ltEditor->setTitle("Lighting of Desk");
   ltEditor->show();

   SoXtRenderArea *myRenderArea = new SoXtRenderArea(myWindow);

   // Set up Camera with ViewAll...
   // -- use the SO_GET_PART macro to get the camera node.
   // -- viewall is a method on the 'camera' part of
   //    the cameraKit, not on the cameraKit itself.  So the part
   //    we ask for is not 'cameraList[0]' (which is of type
   //    SoPerspectiveCameraKit), but
   //    'cameraList[0].camera' (which is of type
   //    SoPerspectiveCamera).
   SoPerspectiveCamera *myCamera = SO_GET_PART(myScene,
      "cameraList[0].camera", SoPerspectiveCamera);
   SbViewportRegion myRegion(myRenderArea->getSize());
   myCamera->viewAll(myScene, myRegion);
   myRenderArea->setSceneGraph(myScene);
   myRenderArea->setTitle("Main Window: Desk In A Scene Kit");
   myRenderArea->show();

   SoXt::show(myWindow);
   SoXt::mainLoop();
}
|
Example 14-3 creates a balance scale using node kits and their motion hierarchies. Figure 14-15 shows the balance scale created by this example.
// This example illustrates the creation of motion hierarchies
// using nodekits by creating a model of a balance-style scale.

// It adds an SoEventCallback to the "callback" list in the
// nodekit called 'support.'
// The callback will have the following response to events:
// Pressing right arrow key == lower the right pan
// Pressing left arrow key  == lower the left pan
// The pans are lowered by animating three rotations in the
// motion hierarchy.
// Use an SoText2Kit to print instructions to the user as part
// of the scene.

#include <Inventor/events/SoKeyboardEvent.h>
#include <Inventor/nodekits/SoCameraKit.h>
#include <Inventor/nodekits/SoLightKit.h>
#include <Inventor/nodekits/SoSceneKit.h>
#include <Inventor/nodekits/SoShapeKit.h>
#include <Inventor/nodes/SoCone.h>
#include <Inventor/nodes/SoCube.h>
#include <Inventor/nodes/SoCylinder.h>
#include <Inventor/nodes/SoEventCallback.h>
#include <Inventor/nodes/SoText2.h>
#include <Inventor/nodes/SoTransform.h>
#include <Inventor/nodes/SoPerspectiveCamera.h>

#include <Inventor/Xt/SoXt.h>
#include <Inventor/Xt/SoXtRenderArea.h>

// Callback Function for Animating the Balance Scale.
// --used to make the balance tip back and forth
// --Note: this routine is only called in response to KeyPress
//   events since the call 'setEventInterest(KeyPressMask)' is
//   made on the SoEventCallback node that uses it.
// --The routine checks if the key pressed was left arrow (which
//   is XK_Left in X-windows talk), or right arrow (which is
//   XK_Right)
// --The balance is made to tip by rotating the beam part of the
//   scale (to tip it) and then compensating (making the strings
//   vertical again) by rotating the string parts in the opposite
//   direction.
void
tipTheBalance(
   void *userData, // The nodekit representing 'support', the
                   // fulcrum of the balance. Passed in during
                   // main routine, below.
   SoEventCallback *eventCB)
{
   const SoEvent *ev = eventCB->getEvent();

   // Which Key was pressed?
   // If Right or Left Arrow key, then continue...
   if (SO_KEY_PRESS_EVENT(ev, RIGHT_ARROW) ||
        SO_KEY_PRESS_EVENT(ev, LEFT_ARROW)) {
      SoShapeKit  *support, *beam1, *string1, *string2;
      SbRotation  startRot, beamIncrement, stringIncrement;

      // Get the different nodekits from the userData.
      support = (SoShapeKit *) userData;

    // These three parts are extracted based on knowledge of
    // the motion hierarchy (see the diagram in the main
    // routine.
      beam1   = (SoShapeKit *)support->getPart("childList[0]",TRUE);
      string1 = (SoShapeKit *)  beam1->getPart("childList[0]",TRUE);
      string2 = (SoShapeKit *)  beam1->getPart("childList[1]",TRUE);

      //Set angular increments to be .1 Radians about the Z-Axis
      //The strings rotate opposite the beam, and the two types
      //of key press produce opposite effects.
      if (SO_KEY_PRESS_EVENT(ev, RIGHT_ARROW)) {
         beamIncrement.setValue(SbVec3f(0, 0, 1), -.1);
         stringIncrement.setValue(SbVec3f(0, 0, 1), .1);
      }
      else {
         beamIncrement.setValue(SbVec3f(0, 0, 1), .1);
         stringIncrement.setValue(SbVec3f(0, 0, 1), -.1);
      }

      // Use SO_GET_PART to find the transform for each of the
      // rotating parts and modify their rotations.

      SoTransform *xf;
      xf = SO_GET_PART(beam1, "transform", SoTransform);
      startRot = xf->rotation.getValue();
      xf->rotation.setValue(startRot *  beamIncrement);

      xf = SO_GET_PART(string1, "transform", SoTransform);
      startRot = xf->rotation.getValue();
      xf->rotation.setValue(startRot *  stringIncrement);

      xf = SO_GET_PART(string2, "transform", SoTransform);
      startRot = xf->rotation.getValue();
      xf->rotation.setValue(startRot *  stringIncrement);

      eventCB->setHandled();
   }
}

main(int , char **argv)
{
   Widget myWindow = SoXt::init(argv[0]);
   if (myWindow == NULL) exit(1);

   SoSceneKit *myScene = new SoSceneKit;
   myScene->ref();

   myScene->setPart("lightList[0]", new SoLightKit);
   myScene->setPart("cameraList[0]", new SoCameraKit);
   myScene->setCameraNumber(0);

   // Create the Balance Scale -- put each part in the
   // childList of its parent, to build up this hierarchy:
   //
   //                    myScene
   //                       |
   //                     support
   //                       |
   //                     beam
   //                       |
   //                   --------
   //                   |       |
   //                string1  string2
   //                   |       |
   //                tray1     tray2

   SoShapeKit *support = new SoShapeKit();
   support->setPart("shape", new SoCone);
   support->set("shape { height 3 bottomRadius .3 }");
   myScene->setPart("childList[0]", support);

   SoShapeKit *beam = new SoShapeKit();
   beam->setPart("shape", new SoCube);
   beam->set("shape { width 3 height .2 depth .2 }");
   beam->set("transform { translation 0 1.5 0 } ");
   support->setPart("childList[0]", beam);

   SoShapeKit *string1 = new SoShapeKit;
   string1->setPart("shape", new SoCylinder);
   string1->set("shape { radius .05 height 2}");
   string1->set("transform { translation -1.5 -1 0 }");
   string1->set("transform { center 0 1 0 }");
   beam->setPart("childList[0]", string1);

   SoShapeKit *string2 = new SoShapeKit;
   string2->setPart("shape", new SoCylinder);
   string2->set("shape { radius .05 height 2}");
   string2->set("transform { translation 1.5 -1 0 } ");
   string2->set("transform { center 0 1 0 } ");
   beam->setPart("childList[1]", string2);

   SoShapeKit *tray1 = new SoShapeKit;
   tray1->setPart("shape", new SoCylinder);
   tray1->set("shape { radius .75 height .1 }");
   tray1->set("transform { translation 0 -1 0 } ");
   string1->setPart("childList[0]", tray1);

   SoShapeKit *tray2 = new SoShapeKit;
   tray2->setPart("shape", new SoCylinder);
   tray2->set("shape { radius .75 height .1 }");
   tray2->set("transform { translation 0 -1 0 } ");
   string2->setPart("childList[0]", tray2);

   // Add EventCallback so Balance Responds to Events
   SoEventCallback *myCallbackNode = new SoEventCallback;
   myCallbackNode->addEventCallback(
        SoKeyboardEvent::getClassTypeId(),
            	tipTheBalance, support);
   support->setPart("callbackList[0]", myCallbackNode);

   // Add Instructions as Text in the Scene...
   SoShapeKit *myText = new SoShapeKit;
   myText->setPart("shape", new SoText2);
   myText->set("shape { string \"Press Left or Right Arrow Key\" }");
   myText->set("shape { justification CENTER }");
   myText->set("font { name \"Helvetica-Bold\" }");
   myText->set("font { size 16.0 }");
   myText->set("transform { translation 0 -2 0 }");
   myScene->setPart("childList[1]", myText);

   SoXtRenderArea *myRenderArea = new SoXtRenderArea(myWindow);

   // Get camera from scene and tell it to viewAll...
   SbViewportRegion myRegion(myRenderArea->getSize());
   SoPerspectiveCamera *myCamera = SO_GET_PART(myScene,
      "cameraList[0].camera", SoPerspectiveCamera);
   myCamera->viewAll(myScene, myRegion);

   myRenderArea->setSceneGraph(myScene);
   myRenderArea->setTitle("Balance Scale Made of Nodekits");
   myRenderArea->show();

   SoXt::show(myWindow);
   SoXt::mainLoop();
}
|
